Tired of Manual Jira Entry? Automate Your Workflow with the JIRA REST APIs!
Are you a developer, project manager, or team lead constantly navigating Jira’s interface to create tasks, bugs, or stories? What if you could automate that process, saving precious time and ensuring consistency across your projects? Good news: you can!
This blog post will guide you through the powerful world of Jira’s REST API, showing you exactly how to create issues (tasks, bugs, epics, and more!) programmatically using a simple HTTP POST request. Get ready to streamline your workflow and unlock a new level of Jira efficiency!
Why Automate Jira Issue Creation?
Before we dive into the “how,” let’s talk about the “why.” Automating Jira issue creation offers numerous benefits:
- Time Savings: Drastically reduce the time spent on repetitive manual data entry.
- Consistency: Ensure all issues are created with consistent formatting and required fields.
- Integration: Seamlessly integrate Jira issue creation into your existing tools, scripts, and CI/CD pipelines.
- Scalability: Easily create a large number of issues in bulk when needed.
- Error Reduction: Minimize human errors associated with manual input.
The Core Concept: HTTP POST Request to the Jira API
At its heart, creating an issue in Jira via the API involves sending an HTTP POST request to a specific Jira endpoint. This request carries a JSON payload that contains all the necessary information about the issue you want to create.
Your Jira Endpoint: Where the Magic Happens
The general syntax for the Jira API endpoint to create an issue is:
https://<Your Domain>.atlassian.net/rest/api/3/issue
Sample Endpoint (as seen in our example):
https://infallibletechie.atlassian.net/rest/api/3/issueReplace <Your Domain> with your actual Jira cloud instance domain.
Crafting Your Request: The JSON Payload
The most crucial part of your POST request is the JSON body, which tells Jira what kind of issue to create and what details to include. This is where you define the project, issue type, summary, description, and any other relevant fields.
Let’s break down a typical JSON payload for creating a “Task” in Jira:
JSON
{
    "fields": {
        "project": {
            "id": "10001"
        },
        "issuetype": {
            "name": "Task"
        },
        "summary": "My New Issue",
        "description": {
            "type": "doc",
            "version": 1,
            "content": [
                {
                    "type": "paragraph",
                    "content": [
                        {
                            "text": "This is a test issue created using Postman and Jira REST API.",
                            "type": "text"
                        }
                    ]
                }
            ]
        }
    }
}
Understanding the Key Fields:
project: Specifies the Jira project where the issue will be created. You can use either theid(numeric ID) or thekey(e.g., “PROJ”) of your project. Using theidis generally more robust.issuetype: Defines the type of issue you want to create (e.g., “Task”, “Bug”, “Story”, “Epic”). Use thenameof the issue type.summary: This is the title of your Jira issue – make it concise and descriptive!description: This field is crucial for providing detailed information. Jira’s modern editor uses an Atlassian Document Format (ADF). The example above shows a simple paragraph. For more complex descriptions (with formatting, mentions, etc.), you’ll need to generate the appropriate ADF.
Pro-Tip for Descriptions: To get the correct ADF for a complex description, you can often create an issue manually in Jira with the desired formatting, then retrieve that issue via the Jira GET API. The description field in the API response will show you the exact ADF structure you need!
Authentication: Securing Your Requests
To interact with the Jira API, you’ll need to authenticate your requests. The most common and recommended method for automation is using an API Token.
Steps to get your Jira API Token:
- Log in to your Atlassian account.
- Go to your Atlassian API tokens page.
- Click “Create API token.”
- Give your token a descriptive label (e.g., “Jira Automation”).
- Copy the generated token – you won’t be able to see it again!
Once you have your API token, you’ll typically use Basic Authentication in your HTTP client (like Postman or a script).
- Username: Your Jira email address
- Password: Your generated API Token
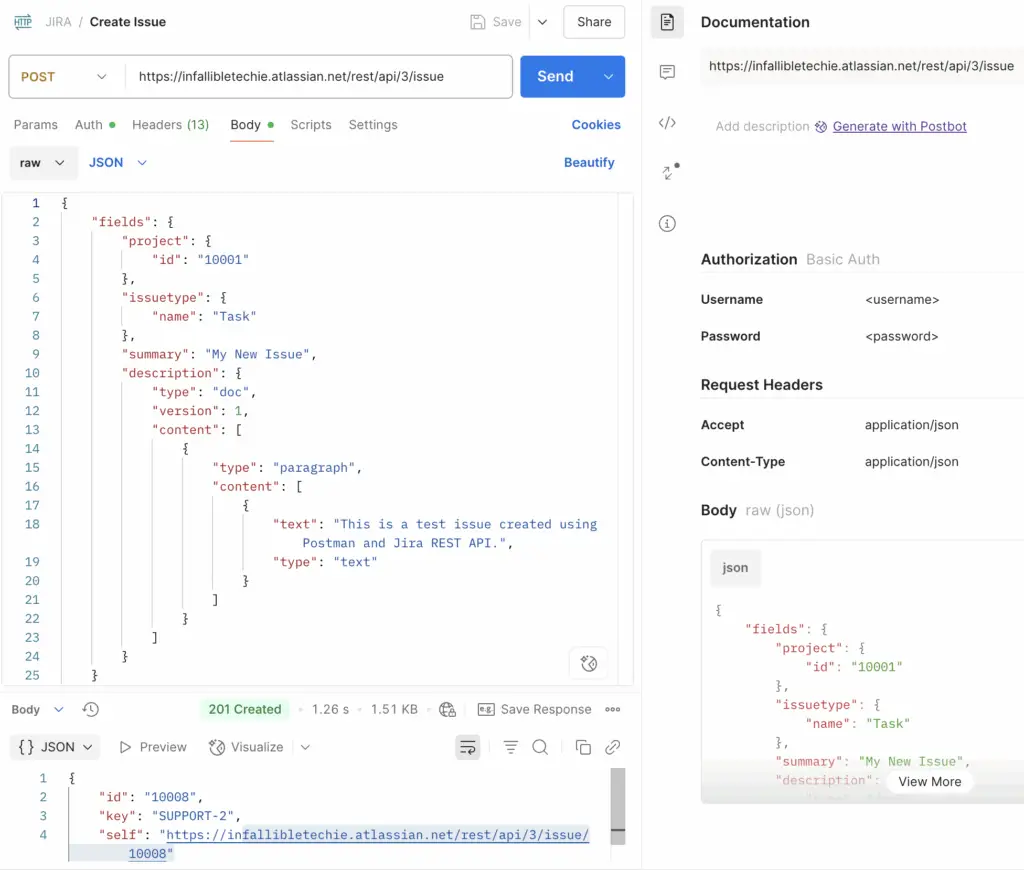
Putting It All Together: A Postman Example
The image you provided showcases a perfect example using Postman, a popular API development environment. Here’s a summary of the steps you’d take in Postman:
- Set Request Type: Select
POST. - Enter Request URL:
https://infallibletechie.atlassian.net/rest/api/3/issue(replace with your domain). - Authentication: Go to the “Authorization” tab, select “Basic Auth,” and enter your Jira email (username) and API token (password).
- Headers:
Content-Type: application/json(This tells Jira that your request body is JSON).Accept: application/json(This tells Jira you prefer JSON in the response).
- Body: Select “raw” and then “JSON” from the dropdown. Paste your JSON payload here.
- Send Request: Click the “Send” button.
Success!
A successful response will typically return an HTTP status code of 201 Created and a JSON body containing the id, key, and self URL of your newly created Jira issue, like this:
JSON
{
    "id": "10008",
    "key": "SUPPORT-2",
    "self": "https://infallibletechie.atlassian.net/rest/api/3/issue/10008"
}
Beyond Postman: Integrating into Your Code
The principles remain the same whether you’re using Postman, Python’s requests library, Node.js axios, or any other programming language. You’ll construct the URL, set the headers (including authentication), and send the JSON body.
Troubleshooting Common Issues
- 400 Bad Request: Check your JSON payload for syntax errors or missing required fields. Ensure
projectandissuetypeare correct. - 401 Unauthorized: Double-check your username (email) and API token. Ensure the API token is active and has the necessary permissions to create issues in the target project.
- 403 Forbidden: Your user account or API token might not have the correct permissions in Jira to create issues in that specific project.
- Incorrect
descriptionformat: Ensure yourdescriptionadheres to the Atlassian Document Format (ADF).
Ready to Automate? Start Now!
By mastering the Jira REST API for issue creation, you’re not just creating tickets; you’re building a more efficient, automated, and error-resistant workflow. Experiment with different issue types, explore adding more fields (like assignee, priority, labels, etc.), and integrate this powerful capability into your daily development and project management tasks.
Please use the following if you need help in getting the JIRA Project Ids.
Reference Article: