Are you diving deep into Jira automation, building custom integrations, or just trying to get a handle on the underlying structure of your projects? If so, you’ve likely encountered the need for a Jira Project ID. While project keys are easily visible, the numerical Project ID often remains hidden, yet it’s crucial for many API calls and advanced operations.
Good news! Getting a Jira Project ID is simpler than you might think, and we’re here to show you exactly how to do it with a quick HTTP GET request.
Why Do You Need a Jira Project ID?
Before we jump into the “how,” let’s quickly cover the “why.” Jira’s REST API, the backbone of its extensibility, frequently requires the numerical Project ID for various operations. Whether you’re:
- Fetching detailed project metadata: Beyond what the project key alone can provide.
- Automating workflows: Especially when interacting with specific project settings or components.
- Developing custom scripts: For reporting, data extraction, or bulk operations.
- Integrating Jira with other tools: Many third-party applications will ask for the Project ID.
Understanding how to retrieve this ID is a fundamental step for anyone looking to leverage Jira’s full potential.
The Simple Way: Using an HTTP GET Request
The most straightforward and reliable method to obtain a Jira Project ID is by performing an HTTP GET request using your project key. This method is incredibly versatile and can be executed using various tools like Postman, Insomnia, curl, or even directly from your browser’s developer console.
The Magic Syntax:
To get your Project ID, you’ll use the following API endpoint:
https://<Your Domain>.atlassian.net/rest/api/latest/project/<Project-Key>
Let’s break it down:
<Your Domain>.atlassian.net: This is your Jira Cloud instance URL. For example, if your Jira URL ishttps://mycompany.atlassian.net, thenmycompanyis your domain./rest/api/latest/project/: This is the standard Jira REST API path for accessing project information.<Project-Key>: This is the unique, short alphanumeric identifier for your project (e.g., “SUPPORT”, “PROJ”, “DEV”). You can find this in your Jira project’s URL or next to the project name.
Authentication: Securing Your Requests
To interact with the Jira API, you’ll need to authenticate your requests. The most common and recommended method for automation is using an API Token.
Steps to get your Jira API Token:
- Log in to your Atlassian account.
- Go to your Atlassian API tokens page.
- Click “Create API token.”
- Give your token a descriptive label (e.g., “Jira Automation”).
- Copy the generated token – you won’t be able to see it again!
Once you have your API token, you’ll typically use Basic Authentication in your HTTP client (like Postman or a script).
- Username: Your Jira email address
- Password: Your generated API Token
Step-by-Step Example (with a tool like Postman):
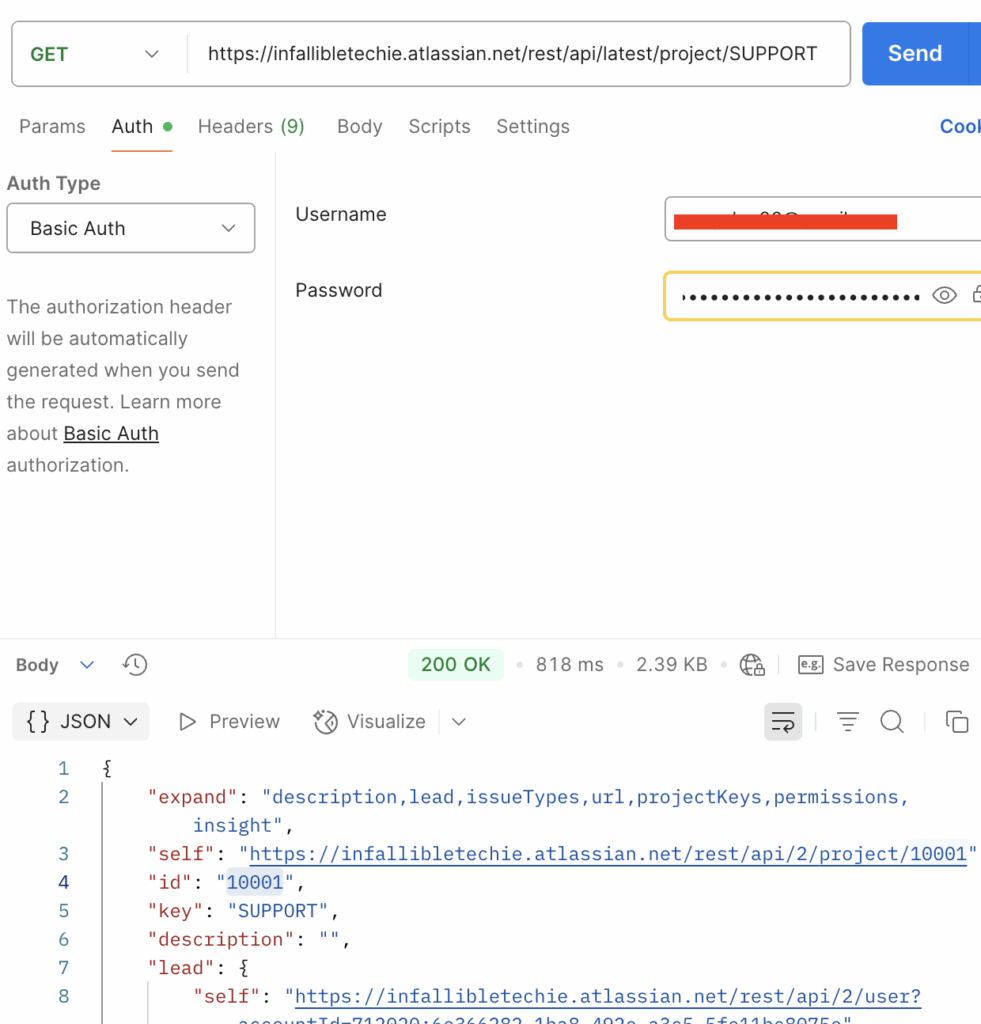
Let’s use an example to illustrate. Imagine your Jira domain is infallibletechie.atlassian.net and your project key is SUPPORT.
- Construct Your URL: Your GET request URL will be:
https://infallibletechie.atlassian.net/rest/api/latest/project/SUPPORT - Choose Your Authentication Method: Jira Cloud APIs typically require authentication. The most common methods are:
- Basic Auth: Using your Jira username (email address) and an API token (recommended over your password). You can generate an API token from your Atlassian account settings.
- OAuth 2.0: For more robust integrations.
- Send the GET Request: Execute the GET request to the constructed URL with the appropriate authentication.
- Parse the Response: If successful (you should receive a
200 OKstatus), the API will return a JSON object containing detailed information about the project. Within this JSON, you’ll find theidfield.

Article for Reference:
https://support.atlassian.com/jira/kb/how-to-get-the-id-of-a-jira-project-from-a-web-browser