Supercharge Your Service Cloud with Salesforce Einstein Case Classification
In today’s fast-paced digital world, customers expect quick and accurate resolutions to their issues. For businesses using Salesforce Service Cloud, manually triaging and routing a high volume of cases can be a significant bottleneck. This is where Salesforce Einstein Case Classification comes in, a powerful AI-powered tool that automates case processing, saving you time and improving customer satisfaction.
This guide will walk you through setting up and utilizing Einstein Case Classification to its full potential.
What is Einstein Case Classification?
Einstein Case Classification is an artificial intelligence feature within Salesforce that automatically predicts and populates case fields based on historical case data. By analyzing the text in a case’s subject and description, Einstein can accurately determine and suggest values for fields like Case Reason, Priority, and Product. This intelligent automation helps your support team focus on resolving issues rather than on manual data entry.
Step-by-Step Implementation Guide
Setting up Einstein Case Classification is a straightforward process. Follow these steps to get started:
1. Enable Einstein Classification: Navigate to Setup in your Salesforce org, search for “Einstein Classification,” and toggle the feature On.
2. Create a New Model: Click the “New Model” button to begin the setup process. You’ll be guided through a series of steps to define what you want Einstein to predict.
3. Build Your Model: Once you’ve configured your model, click the “Build” button. Einstein will then analyze your historical case data to create its predictive model. This may take some time depending on the volume of your data.
4. Configure Predictions: After the model is built, click “Edit” under Configure Predictions. Here, you can set the confidence level at which Einstein will automatically update fields and when it will simply suggest values.
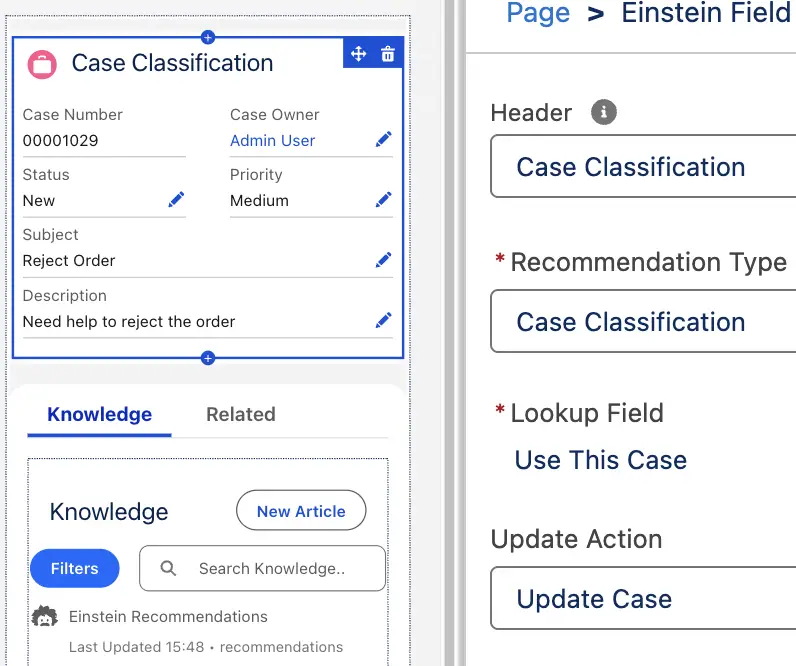
5. Add the Component to Your Page: To make the predictions visible to your users, add the “Einstein Field Recommendations” standard component to your Case Lightning Record Page. Select the Case Classification model you created in Step 2 as the Recommendation Type. You can use an existing update action or create a new Quick Action to include all the fields you want Einstein to predict.
6. Assign Permissions: Ensure your users can access this feature by assigning them the “Einstein Case Classification User” permission set.
7. Start Using Einstein’s Recommendations: Your users will now see an “Einstein Recommendations Available” button on the Einstein Field Recommendations component. Clicking this will show the predicted values, which they can accept to update the case record.
Advanced Automation with Flows and Routing
Take your case automation a step further with these advanced tips:
Automated Routing: Use Assignment Rules or Skills-Based Routing to automatically route cases to the right agent or queue based on the field values updated by Einstein.
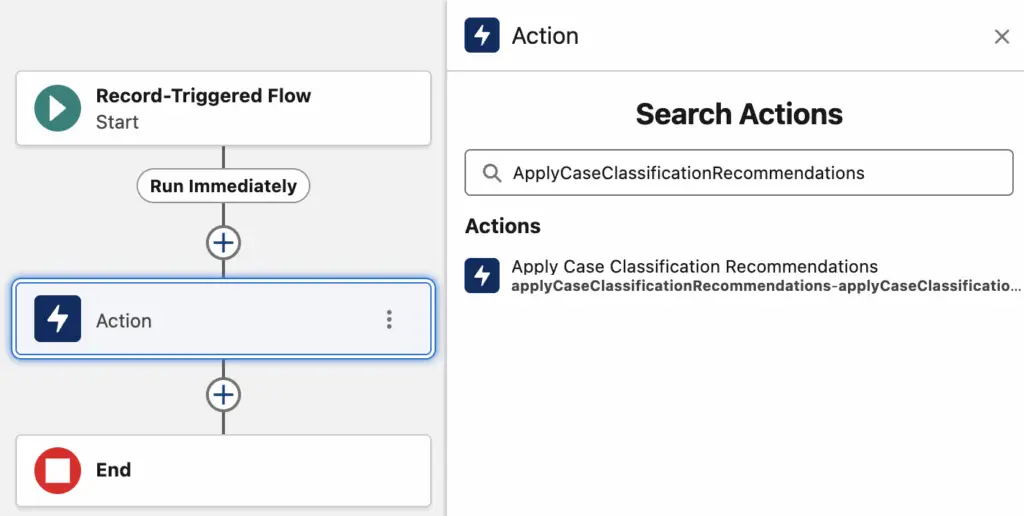
Flow Integration: You can invoke Einstein Case Classification directly from a Case record-triggered Flow. Use the “ApplyCaseClassificationRecommendations” action and then the “Update Records” element to apply the predictions to the case.
Skills-Based Routing Integration: If you have Omni-Channel and Skills-Based Routing enabled, you can select “Run skills-based routing rules after Einstein updates a case” to streamline your routing process even further.
By leveraging the power of AI with Salesforce Einstein Case Classification, you can significantly reduce manual effort, improve the accuracy of your case data, and ultimately provide a faster, more efficient service experience for your customers.
Salesforce Article:
https://help.salesforce.com/s/articleView?id=service.cc_service_what_is.htm&type=5