
Auto-Populate User Language in Salesforce Messaging for Web | Step-by-Step Guide
Boost your customer experience! Learn the quick 6-step process to automatically detect and set the user’s language in Salesforce Messaging for Web. No more manual selection, just seamless support.
In today’s global marketplace, providing a personalized customer experience is paramount. A crucial first step is communicating with customers in their preferred language. Manually asking users to select their language can add unnecessary friction to the support process. Fortunately, Salesforce offers a simple way to streamline this interaction.
By enabling a single setting, you can automatically detect the user’s browser language and set it as the default in your Messaging for Web chat window. This small tweak creates a smoother, more intuitive experience for your customers from the very first interaction.
Ready to make your support process more efficient? Here’s how to set it up in just a few clicks.
Why You Should Enable Preferred Language Identification
Before we dive into the “how,” let’s touch on the “why.” Automatically setting the user’s language:
- Reduces Customer Effort: Eliminates a step for the user, getting them to help faster.
- Improves First Impressions: Shows your company is thoughtful and technologically savvy.
- Ensures Accurate Routing: Helps ensure the messaging session is routed to an agent with the right language skills from the start.
- Boosts CSAT: A seamless, personalized experience is a key driver of customer satisfaction.
Your 6-Step Guide to Automating User Language
Follow these simple steps to configure your Salesforce Messaging Channel to automatically recognize the user’s language.
1. Navigate to Salesforce Setup
First things first, log in to your Salesforce org and head to the Setup page. You can find this by clicking the gear icon ⚙️ in the top-right corner.
2. Find Messaging Settings
In the ‘Quick Find’ box on the left-hand side of the Setup menu, type “Messaging Settings” and select it from the results.
3. Select Your Messaging Channel
You’ll see a list of your existing messaging channels. Click on the specific Messaging for Web channel you want to update.
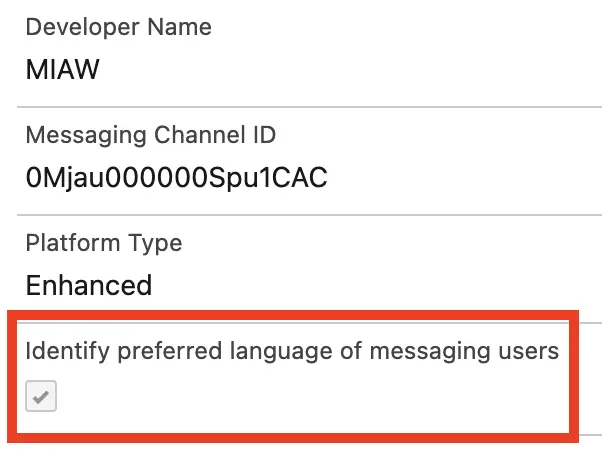
4. Enable Preferred Language Identification
This is the key step! Within your channel’s settings, look for the option “Identify preferred language of messaging users“. Click the checkbox to enable this feature. This tells Salesforce to check the visitor’s browser language settings.
5. Save Your Changes
Don’t forget to click the Save button to apply the change to your messaging channel configuration.
6. Publish to Go Live
Your work isn’t quite done yet. The changes need to be pushed to your live website or application.
- Go back to Setup.
- Use the ‘Quick Find’ box to search for and select “Embedded Service Deployments“.
- Find the deployment associated with your messaging channel and click the dropdown arrow on the right.
- Click View.
- Finally, hit the Publish button. This ensures your website is using the latest, updated version of your chat configuration.
A Simple Change, A Big Impact
And that’s it! In just a few minutes, you’ve configured your Salesforce Messaging for Web channel to be smarter and more user-friendly. By automatically detecting and setting the user’s language, you remove a barrier to communication and create a more welcoming environment for every customer, no matter where they are or what language they speak.