Seamlessly Connect Salesforce and Jira with Declarative Webhooks: A No-Code Guide 🚀
Ever wished you could automatically create a Jira ticket whenever a new Case is logged in Salesforce, without begging for developer time? Good news! With the power of Declarative Webhooks, you can build this integration using clicks, not code.
This guide will walk you through, step-by-step, how to set up a seamless bridge between Salesforce and Jira. When a new Case is created in Salesforce, a corresponding Jira ticket will be automatically generated. Let’s get started!
The Big Picture: What We’re Building
Our goal is straightforward: automate the creation of a Jira ticket directly from a Salesforce Case creation. This eliminates the need for manual data entry, reduces the risk of human error, and ensures that development and support teams are always in sync.
Here’s the flow:
- A new Case is created in Salesforce.
- A Record-Triggered Flow in Salesforce is initiated.
- This flow calls a Declarative Webhooks Apex Action.
- The Declarative Webhooks action performs a Callout to Jira
- A new Jira ticket is created with details from the Salesforce Case.
Step 1: Install Declarative Webhooks from the AppExchange
First things first, you need to install the Declarative Webhooks package from the Salesforce AppExchange. This free tool is the key to our no-code integration.
- Navigate to the Salesforce AppExchange.
- Search for “Declarative Webhooks.”
- Click “Get It Now” and follow the installation prompts for your desired Salesforce org.
Step 2: Configure the Callout Template
Once the package is installed, it’s time to teach Salesforce how to communicate with Jira. We’ll do this by creating a Callout Template.
- From the App Launcher, find and open the Declarative Webhooks app.
- Click on the Callout Templates tab.
- Click the New button to create a new template.
- Now, let’s fill in the details:
- Template Name: A descriptive name like
Create Jira Ticket. - Method:
POST(since we are creating a new resource in Jira). - Callout URL: This is the endpoint for creating an issue in your Jira instance. It will look something like this:
https://YOUR_JIRA_DOMAIN.atlassian.net/rest/api/2/issue. Be sure to replaceYOUR_JIRA_DOMAINwith your actual Jira domain. - Authentication: For Jira Cloud, you’ll typically use Basic Authentication. The username will be your email address, and the password will be your Jira API token. You can generate a token from your Atlassian account settings under “Security.”
- Main Object: Case
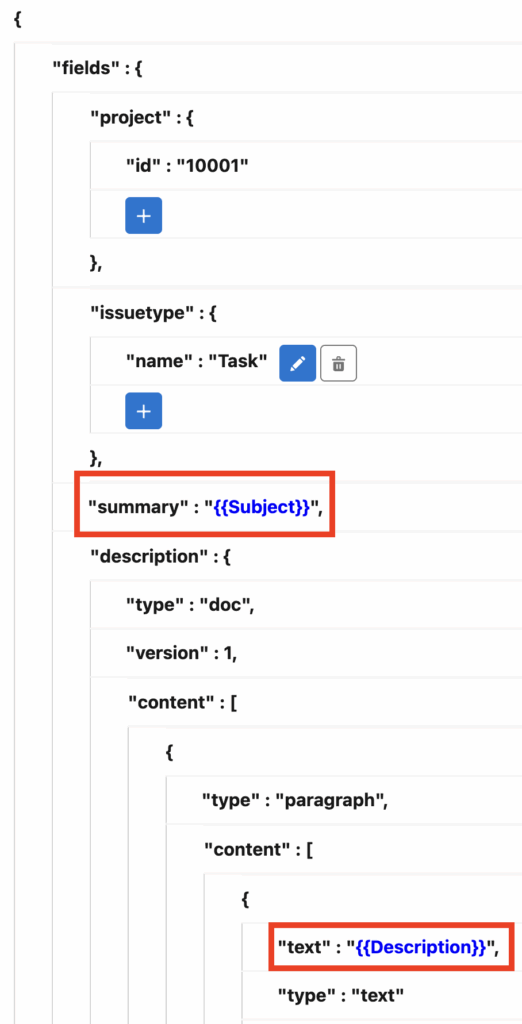
- Request Body: This is the JSON payload that we will send to Jira. To start, you can use a basic structure like the one below. We will make this dynamic in a later step.
- Template Name: A descriptive name like
{
    "fields": {
        "project": {
            "id": "10001"
        },
        "issuetype": {
            "name": "Task"
        },
        "summary": "{{Subject}}",
        "description": {
            "type": "doc",
            "version": 1,
            "content": [
                {
                    "type": "paragraph",
                    "content": [
                        {
                            "text": "{{Description}}",
                            "type": "text"
                        }
                    ]
                }
            ]
        }
    }
}
Step 3: Map the Subject and and Description fields from the Case to the JIRA JSON payload
- Open the Callout Template.
- Use the pencil icon to edit summary and description with Subject and Description fields from the main object “Case”.

Step 4: Secure the Connection with Remote Site Settings
For Salesforce to be able to send information to Jira, you need to add the Jira domain to your Remote Site Settings.
- In Salesforce Setup, search for “Remote Site Settings.”
- Click New Remote Site.
- Give it a name, like
Jira, and for the URL, enter your Jira domain:https://YOUR_JIRA_DOMAIN.atlassian.net. - Ensure the Active checkbox is checked and save.
Step 5: Test and Generate Flow Classes
Before we build our flow, let’s test the connection.
- In the Callout Template, click the Test button.
- You can manually select a Case record to see if a ticket is created in Jira.
- Once the test is successful, click the Generate Flow Classes button. This will create the necessary Apex code that we can use in our Salesforce Flow.
Step 6: Build the Record-Triggered Flow
Now it’s time to put everything together in a Flow.
- In Salesforce Setup, go to Flows and create a new Record-Triggered Flow.
- Configure the trigger to run when a Case is created.
- Choose to run the flow with an Asynchronous Path. This is important because we are making a callout to an external system, and it shouldn’t hold up the user.
- In the Asynchronous Path, add an Action element.
- Search for the Apex action that was generated from your Callout Template (it will be named after your template, e.g.,
Create Jira Ticket). - You will need to set the inputs for this action.
- Record Id: Use the ID of the triggering Case record (
{!$Record.Id}).
- Record Id: Use the ID of the triggering Case record (
- Save and activate your flow.

Apex Action Configuration:

Step 7: The Final Test
You’re all set! Now, create a new Case in Salesforce. In a few moments, you should see a new ticket appear in your designated Jira project, with the subject and description from the Salesforce Case.
Congratulations! You have successfully integrated Salesforce and Jira without writing a single line of code. By leveraging the power of Declarative Webhooks, you can build powerful and maintainable integrations with ease. 🥳
Reference:
You can use this Guide for your reference.