In this Blog Post, you will learn how to configure “Connect Agent as Subagent” in Salesforce Agentforce. Step-by-step guide to multi-agent orchestration, Agent Builder setup, and custom routing logic for architects and developers.
Mastering Salesforce Agentforce: How to Set Up Connect Agent as Subagent
As enterprise AI implementations mature, single-agent architectures often hit a wall when handling complex, multi-domain business logic. Salesforce Agentforce solves this with Multi-Agent Orchestration, introducing the ability to use a Connect Agent as Subagent pattern.
Instead of building a monolithic AI agent that attempts to master every business function, you can now link specialized, independent subagents under a central “orchestrator” agent. This modular architecture allows specialized subagents—such as billing specialists, order fulfillment bots, or technical support handlers—to operate independently while coordinating seamlessly on multi-layered customer requests.
What is “Connect Agent as Subagent”?
Connect Agent as Subagent is a core capability within Agentforce designed for hierarchical agent delegation. In this design pattern:
- Primary Orchestrator Agent: Acts as the main entry point, analyzing incoming user prompts, holding top-level conversation context, and deciding which specialized capability is required.
- Specialist Subagents: Modular, task-specific agents equipped with domain-specific topics, actions, and guardrails tailored to narrow workflows.
When a query exceeds the scope of a single domain, the primary orchestrator delegates execution to the appropriate subagent, receives the processed result, and maintains a unified conversational flow with the user.
Step-by-Step Setup in Agent Builder
Follow these steps to configure subagent delegation within Salesforce Agent Builder:
- Open the Primary Agent: Navigate to Agent Builder and open your primary orchestrator agent in Draft state.
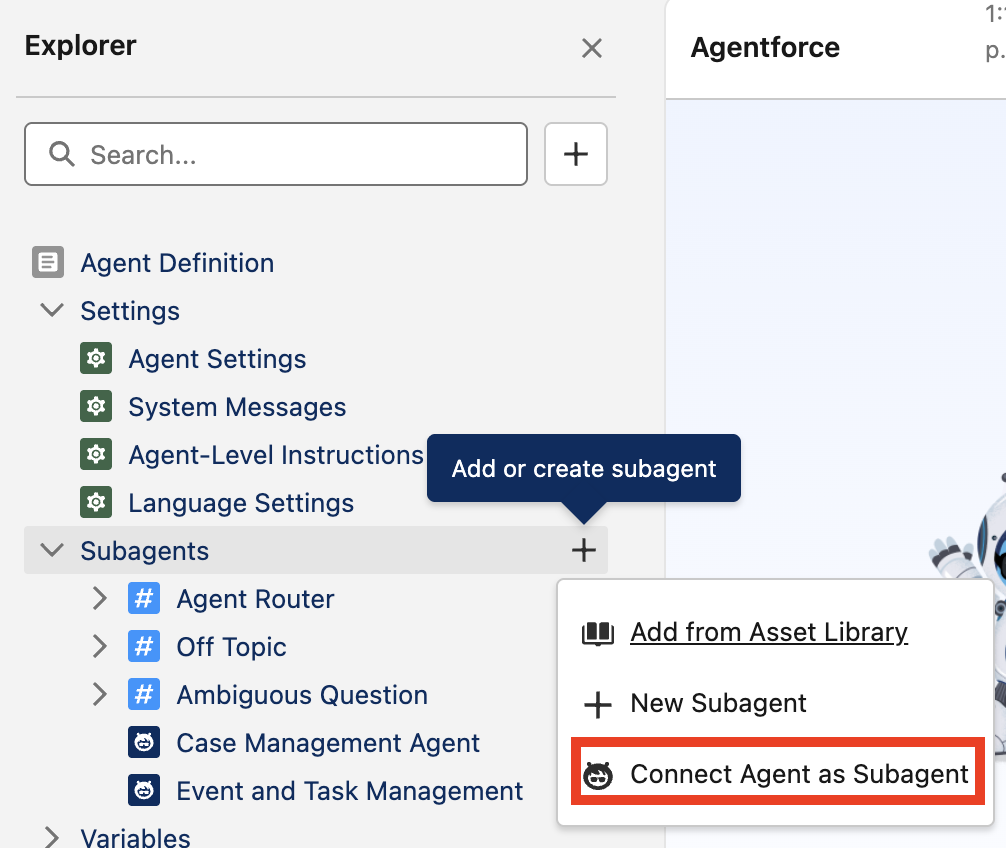
- Access Subagent Configuration: In the Explorer panel, locate the Subagents section, click the
+icon, and select Connect Agent as Subagent. - Select Specialist Agents: Choose the existing specialist agents from your org that you want to connect as subagents and add them to the workspace.
- Define Subagent Descriptions: Write a clear, explicit custom description for each subagent. This description governs the orchestrator’s decision-making process by defining what the subagent does and when the orchestrator should delegate tasks to it.
- Configure Agent Router Logic (If Applicable): If your architecture utilizes an Agent Router, ensure subagents are listed under Actions Available for Reasoning (manually add them if they are not populated automatically). Use the
@symbol within your instructions to explicitly map out routing logic and subagent invocation triggers.
Recommendations & Best Practices
To ensure reliable routing and optimal performance across multi-agent networks, apply the following design principles:
1. Write Precise, Trigger-Oriented Descriptions
The primary orchestrator relies heavily on semantic matching against subagent descriptions.
- Avoid: Vague summaries like “Handles account stuff.”
- Do: Use clear boundary definitions like “Invoked strictly when the user requests invoice downloads, billing adjustments, or payment method updates.”
2. Guard Against Infinite Routing Loops
When chaining multiple subagents, define clear return paths and terminal states. Ensure subagents pass control back to the orchestrator once their domain task is complete rather than attempting cross-subagent delegation without orchestrator oversight.
3. Maintain Scope Separation (Principle of Least Privilege)
Avoid duplicating topics or actions across subagents. If two subagents share identical actions, the orchestrator’s reasoning engine may experience routing ambiguity, resulting in inconsistent delegation.
4. Test Routing Explicitly with the @ Syntax
When using Agent Routers, test target delegation by explicitly referencing subagents with @SubagentName in sample prompt instructions during draft testing. Verify that the reasoning log clearly indicates why a specific subagent was selected or bypassed.