In this Blog Post, you will learn how to run a Salesforce Screen Flow directly in Slack using the Sales Cloud for Slack app. A complete step-by-step tutorial for Salesforce Admins and Developers.
How to Run a Salesforce Screen Flow in Slack: Step-by-Step Guide
Bringing Salesforce automation directly into your team’s communication hub can drastically improve user adoption and productivity. For Salesforce Consultants, Admins, and Developers looking to bridge the gap between their CRM and messaging platforms, learning how to run a Salesforce Screen Flow in Slack is an essential skill.
By leveraging the “Sales Cloud for Slack” integration, users can execute complex Salesforce processes without ever having to leave their Slack workspace.
In this guide, we will walk you through the complete setup process, from assigning the right permissions to triggering your Screen Flows dynamically.
Prerequisite: Connect Salesforce and Slack (One-Time Setup)
Before you can run a flow, you must establish the initial connection between your Salesforce org and your Slack workspace.
If you haven’t done this yet, please follow this detailed one-time setup guide:
🔗 Create Salesforce Records from Slack: Step-by-Step Guide
Once your connection is established, proceed with the steps below.
Step 1: Assign the Required System Permissions
To initiate the integration, you need the proper administrative privileges.
Create a Permission Set, assign it to yourself, and ensure it includes the following System Permissions:
Connect Salesforce with SlackManage Slack app organization connections for Slack appsManage Slack user mappings
Step 2: Configure Slack Apps Setup in Salesforce
- Navigate to Salesforce Setup.
- Search for and select Slack Apps Setup.
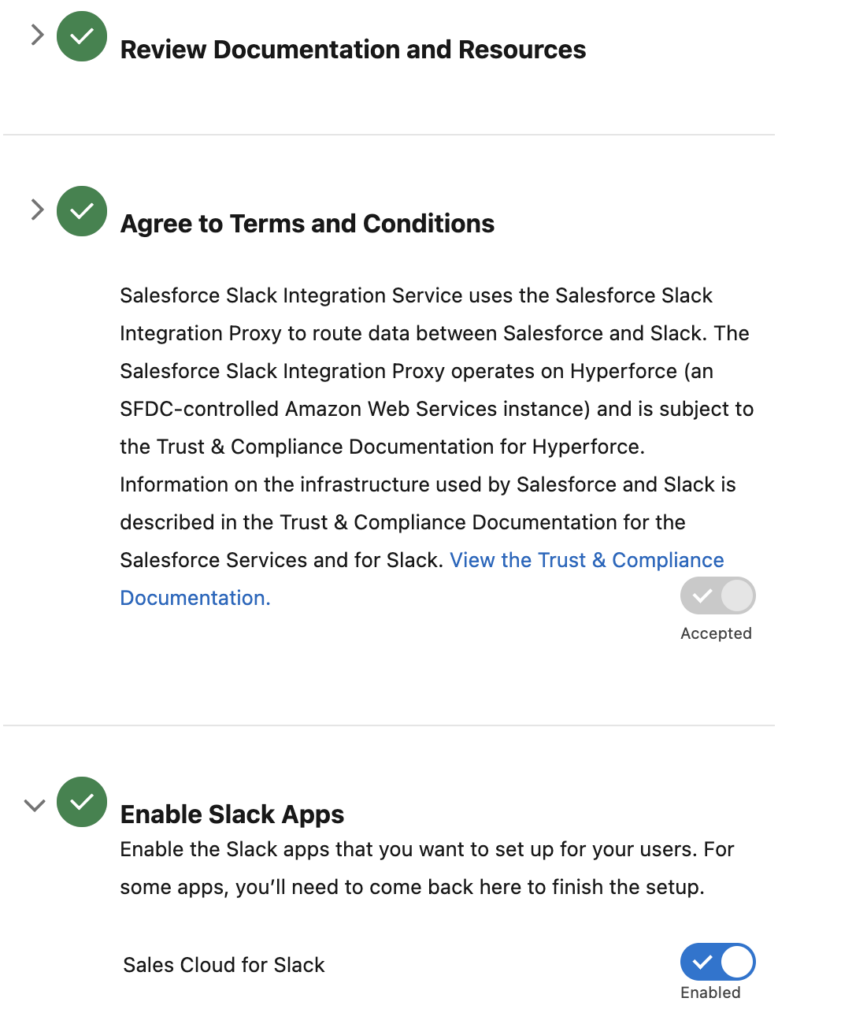
- Complete the “Review Documentation and Resources” section.
- “Agree to Terms and Conditions”.
- Enable the toggle for “Sales Cloud for Slack”.
Step 3: Enable Sales Cloud For Slack
- Staying in Salesforce Setup, search for and navigate to Sales Cloud For Slack.
- Complete the step to “Verify the Sales Cloud for Slack App is Enabled”.
- Complete “Review Documentation and Resources”.
Step 4: Install the Slack App
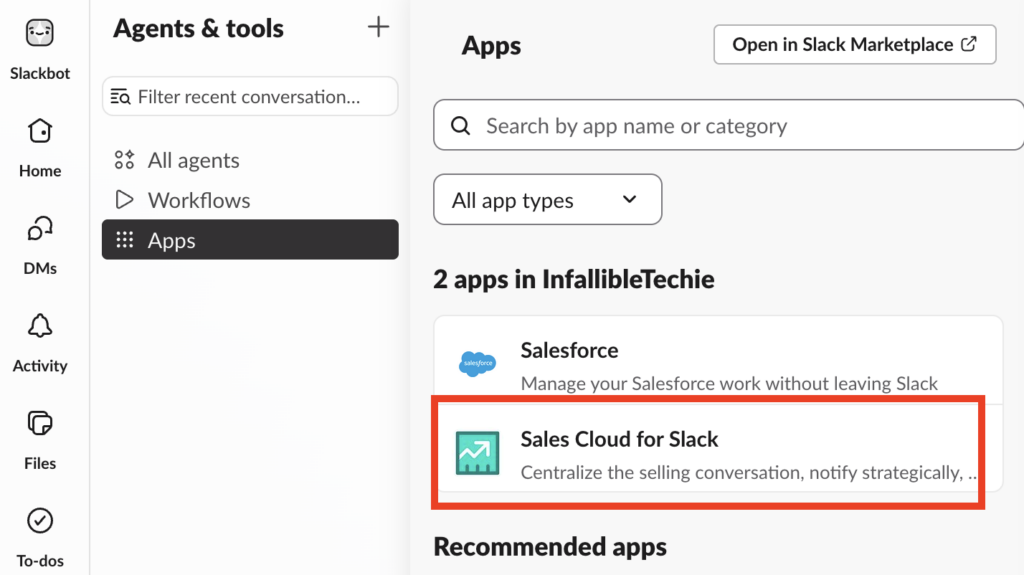
- Open your Slack workspace.
- Navigate to the Slack App Directory.
- Search for and install the “Sales Cloud for Slack” App.
Step 5: Create Your Salesforce Screen Flow
Jump into Salesforce Flow Builder and create the Screen Flow that you want your users to interact with. Add your required screen components, input fields, and backend DML logic as you normally would.
Step 6: Make the Screen Flow Available in Slack
This is the critical step that bridges the Flow Builder with Slack.
- Click Save on your Screen Flow.
- In the Save dialog window, click on the Advanced section.
- Check the box to “Make available in Slack”.
- Save and Activate the Flow.
Step 7: Invoke the Screen Flow Using a Second Flow
To actually send this Screen Flow to Slack, you need a mechanism to trigger it.
- Create another Flow (e.g., a Record-Triggered Flow or Autolaunched Flow) to serve as the invoker.
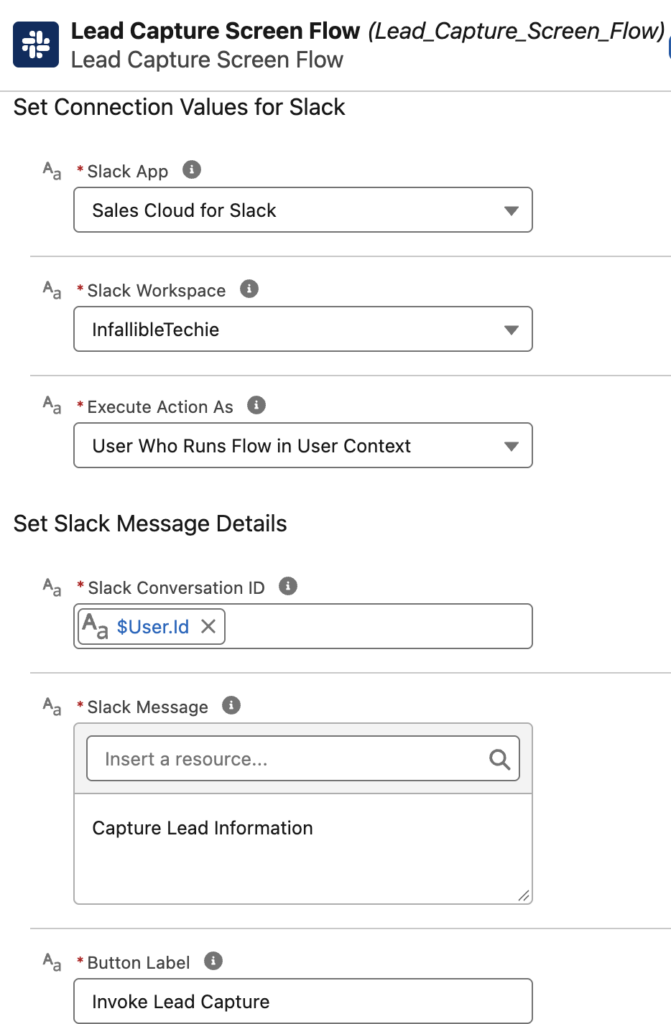
- In this second flow, add an Action element and search for the Screen Flow Name (the first flow you created with the “Make available in Slack” property enabled).
- Configure the Slack App with “Sales Cloud for Slack”.
- Fill out the Slack Conversation ID and Button Label details.
(Refer to the screenshot below for the exact configuration mapping).
💡 Recommendations & Best Practices
As promised, here are the architectural best practices and system behaviors you should keep in mind when designing this architecture:
- Understanding Auto-Generated Actions: Every time you create a Slack-enabled screen Flow (by checking “Make available in Slack”), a unique
SendMessageToLaunchFlowaction is automatically generated behind the scenes. This is the specific action used to send the flow into Slack. - Dynamic Slack Routing: When your second Flow gets executed, it uses the Slack Conversation ID to determine the destination.
- Channel Routing: If the ID belongs to a Slack Channel, the message and flow trigger will be sent to that public or private Slack Channel.
- Direct Message Routing: If you pass a running user ID into this parameter, it will send a Direct Message (DM) to that specific Slack User.
- User Experience (UX): Users do not see the raw Flow URL. Instead, they can invoke the Screen Flow directly from the Slack message by clicking a button. Make sure to carefully configure the Button Label value in your action so the call-to-action is clear for your end users (e.g., “Log a Call” or “Update Opportunity”).
Are you implementing Salesforce-to-Slack flows in your org? Let us know what use cases you are building in the comments below!