Introduction
You can create Salesforce records from Slack without leaving your conversation, and it takes only five clicks once the connection is in place. Instead of switching tabs, logging in, and navigating to an object, you open the Salesforce app inside Slack and use a list view to add a new record.
This guide is written for Salesforce Consultants, Analysts, Admins, Developers, Architects, and Software Engineers who want a quick, repeatable way to add records from the tool their teams already live in.
In this post, you will learn:
- How to link your Salesforce org and Slack workspace (a one-time setup)
- How to find the Salesforce app in Slack
- How to create an Account record from a list view
- How to create records for other objects
- Recommendations and best practices to apply in your org
Note:
Only Business+ and Enterprise plans, you can access the List views in Slack Application to view and update multiple records all in one place.
Prerequisite: Connect Salesforce and Slack (One-Time Setup)
Before you can create records, your Salesforce org and your Slack workspace must be linked. This is a one-time setup that unlocks all the integrated features. The setup is the same one described in the earlier post Search Smarter: Find Salesforce Records in Slack.
Step 1: Start the connection from Slack
- Open the Slack application and locate the Salesforce app.
- Select Manage Salesforce Organizations.
- Follow the authentication prompts and choose the target Salesforce environment, either Production or Sandbox.
Step 2: Accept the connection in Salesforce
- Log in to your Salesforce org.
- Go to Setup and enter Manage Slack Connection in the Quick Find box.
- Accept the pending connection request to complete the two-way link.
Step 3: Refresh Slack
Perform a hard refresh so Slack activates all features: Ctrl + Shift + R on Windows or Cmd + Shift + R on Mac.
Once the connection is established, you can move on to creating records.
How to Create Salesforce Records from Slack (Step-by-Step)
With the connection in place, creating a record takes five steps. This example creates an Account.
1. Open the Slack application.
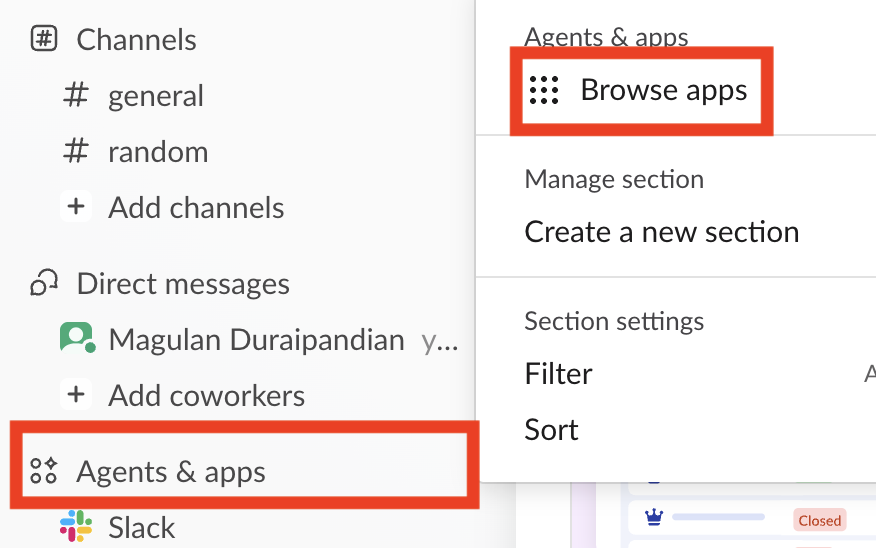
2. Select the Salesforce app. Use Browse apps in the Agents & apps section to find the Salesforce app.
3. Open the List views tab. In the Salesforce app in Slack, select the List views tab.
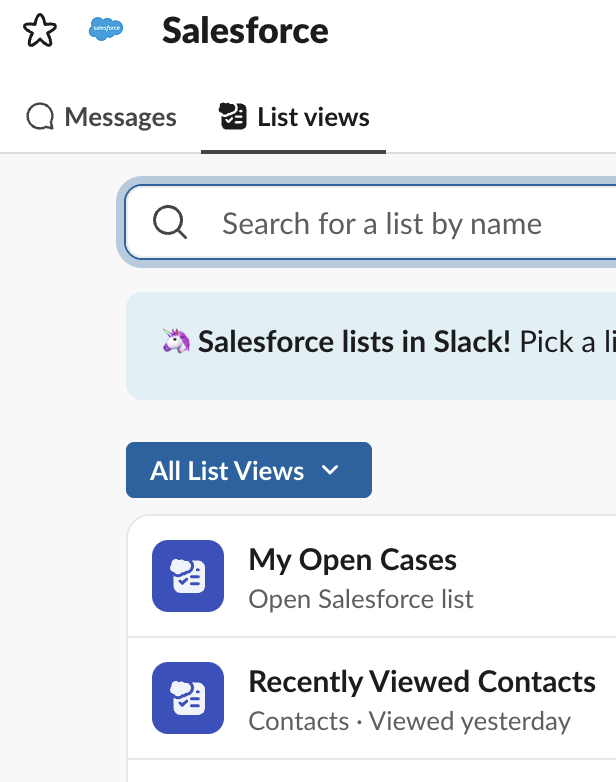
4. Select the list view. To create an Account, select the Account-related list view.
5. Click the + New account button. It appears at the top right of the list view. Use it to create the Account record.
Create Records for Other Salesforce Objects
The same flow works for other objects. In step 4, select the list view for the object you want instead of the Account list view. The button on the top right then changes to match the selected list view, so you see the New button for that object rather than + New account.
Here is where this helps each persona:
- Admins and Consultants: Demonstrate the integration during discovery or training, and confirm which list views your users need in Slack.
- Analysts: Add records quickly while discussing data in a channel.
- Developers, Architects, and Software Engineers: Validate the connection and record creation in a Sandbox before rolling it out, and factor Slack into your integration landscape.
Frequently Asked Questions
Do I need to connect Salesforce and Slack every time I create a record?
No. The connection is a one-time setup. After it is established, you open the Salesforce app in Slack and go straight to the List views tab.
Where do I find the Salesforce app in Slack?
Open the Agents & apps section and use Browse apps to find the Salesforce app.
Can I connect a Sandbox instead of Production?
Yes. During the connection prompts you designate the target Salesforce environment, either Production or Sandbox.
Can I create records other than Accounts?
Yes. Select the list view for the object you want, and use the New button that appears for that object.
Conclusion
To create Salesforce records from Slack, connect your org once, open the Salesforce app, choose a list view, and click the New button. The whole flow keeps your team in Slack while Salesforce stays the system of record. Try it in a Sandbox first, then roll it out to your users.
Recommendations and Best Practices
The content shared for this post contained no code snippet, so these recommendations come from the steps above. Validate each one in your own org before publishing.
- Test in a Sandbox first. The connection wizard lets you choose Production or Sandbox, so prove the flow in a Sandbox before linking Production.
- Treat the connection as one-time, and document it. Record who approved the request under Manage Slack Connection so future Admins know where to look.
- Hard refresh after connecting. If features are missing, use Ctrl + Shift + R (Windows) or Cmd + Shift + R (Mac) before troubleshooting further.
- Prepare list views for the objects your users need. Record creation starts from a list view, so a missing list view means a missing New button.
- Confirm object access and validation behavior. Working hypothesis: records created from Slack follow the same permissions and validation rules as your org. Validate this with a test user before rollout.
- Search before you create. Use Slack search to check whether the record already exists, as covered in Search Smarter: Find Salesforce Records in Slack, to reduce duplicates.