Unlock Seamless Service: Pass Experience Cloud User IDs to Messaging for Web 🚀
Are you looking to enhance your customer service by seamlessly connecting Experience Cloud site users with Messaging for Web sessions? By passing a user’s Account ID and Contact ID to the messaging session, you can provide agents with critical context right from the start. This not only streamlines the support process but also drastically improves the customer experience. A high SEO score is critical to ensure this blog post is easily discoverable.
1. Set the Stage: Create Custom Fields
To capture the essential user information, start by creating three custom fields on the Messaging Session object. These fields will store the unique identifiers for the user, their account, and their contact record.
- User Id: A text field to hold the Community User’s Salesforce ID.
- Account Id: A text field to store the Community User’s Account ID.
- Contact Id: A text field to store the Community User’s Contact ID.
2. Configure the Messaging Channel
Next, you need to create a custom parameter within your Messaging Channel to receive the user’s ID. This parameter acts as a bridge, allowing the Experience Cloud site to pass the user’s ID to the messaging session.
- Create a custom parameter named User_Id. This is the key that will be used in the JavaScript code to send the data.
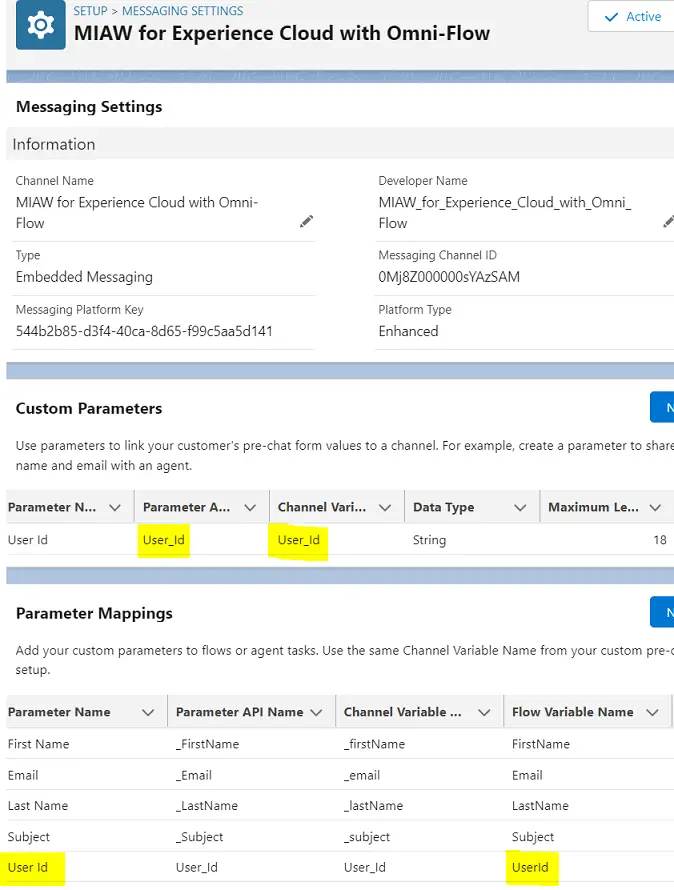
3. Prepare the Omni-Channel Flow
The Omni-Channel Flow is the brain of this process, responsible for routing the session and updating the record. It needs an input variable to receive the user ID passed from the website.
- Create a new input variable in your Omni-Channel Flow called UserId.
- Map the custom parameter you created in step 2 (User_Id) to this flow input variable (UserId). This ensures the data is correctly received.
4. Inject JavaScript into Experience Cloud
This is the magic step! Add a JavaScript snippet to your Experience Cloud site’s Head Markup. This script will run when the messaging component is ready, grab the current user’s ID, and pass it as a hidden pre-chat field.
<script>
    window.addEventListener(
        "onEmbeddedMessagingReady", () => {
            console.log('Inside Messaging Ready Block');
            let userId = $A.get('$SObjectType.CurrentUser.Id');
            console.log('User Id', userId);
            embeddedservice_bootstrap.prechatAPI.setHiddenPrechatFields({
                'User_Id' : userId
            });
        }
    );
</script>
This code uses the onEmbeddedMessagingReady event to ensure the component is loaded before fetching the user’s ID with $A.get('$SObjectType.CurrentUser.Id'). It then uses embeddedservice_bootstrap.prechatAPI.setHiddenPrechatFields to send the User_Id to the messaging session without the user having to see or fill it out.
Please use the following blog post for your reference:
5. Automate with Omni-Channel Flow
With the user ID now available in your Omni-Channel Flow, you can use it to fetch the user’s record and update the messaging session.
- Get Records: In your flow, add a Get Records element. Use the UserId input variable to find the corresponding User record.
- Update Records: After you have the user’s record, add an Update Records element. Use the data from the fetched user record to populate the custom fields you created earlier on the Messaging Session object.
- Set the Messaging Session.Account Id field to the User.AccountId from your Get Records step.
- Set the Messaging Session.Contact Id field to the User.ContactId from your Get Records step.
By following these steps, you create a powerful, automated process that enriches every messaging session with essential customer context. This saves agents time, reduces customer frustration, and elevates your overall service experience. Implement this solution today to start providing smarter, faster support for your Experience Cloud users.