Supercharge Your Flows: Using Lightning Web Components as Flow Actions 🚀
Salesforce Flow is an incredibly powerful tool for automating business processes. But what happens when you need to run custom, client-side logic that goes beyond standard Flow elements? The answer is Lightning Web Components (LWC).
By leveraging the lightning__FlowAction interface, you can create “headless” LWCs that act as custom actions within your Flows. These actions run in the background without a user interface, allowing you to execute JavaScript, interact with the browser, and pass data back to your Flow seamlessly.
Let’s dive into how you can build one.
The Magic Ingredient: lightning__FlowAction
The key to making an LWC available as a Flow Action is the lightning__FlowAction target in the component’s configuration file (js-meta.xml). When a component targets this interface, Salesforce tells Flow Builder, “Hey, you can use this component as a callable Action!”
Unlike LWCs used on record pages or in screen flows, these components don’t need an HTML template because they aren’t meant to be seen. Their sole purpose is to execute logic via a special JavaScript method.
Example: Get the User’s Form Factor
Let’s build a simple LWC action that detects whether the user is on a desktop or mobile device and passes that information back to the Flow.
1. The JavaScript File (formFactorAction.js)
The core logic resides in the JavaScript file. The Flow invokes the component by calling the @api invoke() method, which is the required entry point for a Flow Action.
JavaScript
import { LightningElement, api } from 'lwc';
// Import a module to get the client's form factor (Desktop, Mobile, etc.)
import FORM_FACTOR from '@salesforce/client/formFactor';

export default class FormFactorAction extends LightningElement {

    // Define a public property to store the output value
    @api formFactor;

    // This method is automatically called when the Flow executes the action
    @api invoke() {
        console.log('Form Factor Action invoked!');

        // Get the current form factor from the browser
        const currentFormFactor = FORM_FACTOR;

        // Assign the value to our public property to send it back to the Flow
        this.formFactor = currentFormFactor;
        console.log('Detected Form Factor: ' + this.formFactor);
    }
}
Key Points:
@api invoke(): This is the essential method that the Flow calls to run your component’s logic.@api formFactor: A property decorated with@apibecomes public. In the context of a Flow Action, this can be used as an output variable to pass data from the LWC back into a Flow variable.FORM_FACTOR: A handy Salesforce module that provides the client’s device type.
2. The Configuration File (formFactorAction.js-meta.xml)
This XML file tells Salesforce how and where the component can be used. This is where we expose the LWC to the Flow Builder.
XML
<?xml version="1.0" encoding="UTF-8"?>
<LightningComponentBundle xmlns="http://soap.sforce.com/2006/04/metadata">
    <apiVersion>64.0</apiVersion>
    <isExposed>true</isExposed>
    <targets>
        <target>lightning__FlowAction</target>
    </targets>
    <targetConfigs>
        <targetConfig targets="lightning__FlowAction">
            <property
                name="formFactor"
                type="String"
                label="Form Factor"
                description="Returns the form factor of the device running the flow."/>
        </targetConfig>
    </targetConfigs>
</LightningComponentBundle>
Key Points:
<target>lightning__FlowAction</target>: This is the critical line that registers the component as a Flow Action.<targetConfig targets="lightning__FlowAction">: This block is where you define the input and output variables that Flow Builder will see.<property name="formFactor" ... />: This exposes ourformFactorJavaScript property to the Flow. Because we are setting its value inside theinvoke()method, it acts as an output parameter.
3. The HTML File (formFactorAction.html)
Since this is a headless action that performs a task in the background, it doesn’t need a user interface. Therefore, the HTML file is empty.
HTML
<template>
</template>
Using Your New Action in a Flow
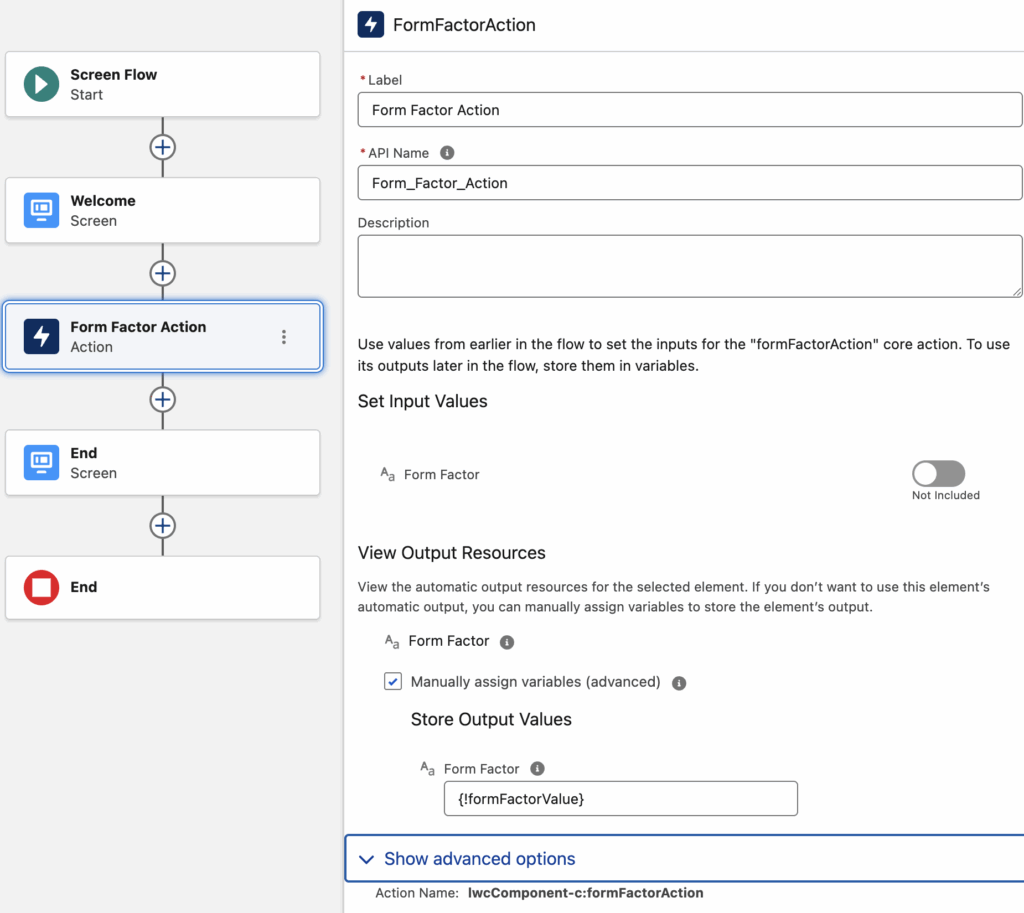
Once you deploy this LWC to your org, using it is simple:
- Open Flow Builder and create a new Screen Flow.
- Add an Action element to the canvas.
- In the Action search box, look for your component. It will appear under the “Custom” category with the label you provided (“Form Factor Action”).
- After selecting it, go to the “Advanced” section of the output values.
- You will see your output variable, “Form Factor”. You can now assign this value to a new or existing Flow variable to use it later in your Flow, such as in a decision element or to display on a screen.
And that’s it! You’ve successfully created and used a Lightning Web Component as a custom, client-side action to make your Flows smarter and more powerful.