Master Your Workflow: Connecting GitHub to VS Code and Cursor IDE
In the modern development landscape, seamless integration between your IDE and version control is non-negotiable. Whether you are using the industry-standard VS Code or the AI-integrated Cursor IDE, connecting to GitHub allows for streamlined commits, branching, and collaboration.
This guide outlines the essential steps to link your GitHub repositories to your local environment efficiently.
Prerequisites
- Git Installed: Ensure Git is installed on your local machine.
- GitHub Account: An active account with necessary repository permissions.
- IDE: VS Code or Cursor IDE installed.
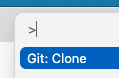
Step 1: Clone the Repository
When starting with an existing project hosted on GitHub, cloning is the most direct method to sync your local environment.
- Open your IDE (VS Code or Cursor).
- Access the Command Palette:
- Windows/Linux:
Ctrl + Shift + P - macOS:
Command + Shift + P
- Windows/Linux:
- Type and select Git: Clone.
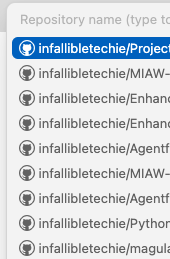
- Select Clone from GitHub. If prompted, allow the IDE to sign in using your GitHub credentials.
- Choose the repository from the dropdown list and select a local folder for the files.
Select Open to open the Project in your IDE.
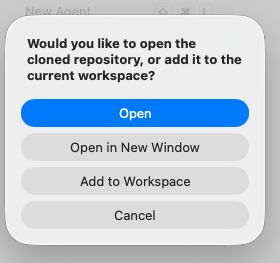
Select the right Project.
Step 2: Initialize Source Control
If you have a local project folder that isn’t yet connected to a GitHub remote, you need to initialize it locally first.
- Open your project folder in the IDE.
- Navigate to the Source Control icon in the Activity Bar (the sidebar on the left).
- Click Initialize Repository.
- This action creates a hidden
.gitfolder, allowing the IDE to start tracking file changes.
Step 3: Branch Management
Effective version control relies on branching to isolate features or fixes from the main codebase.
Switching to an Existing Branch
- Look at the Status Bar in the bottom-left corner of your IDE window.
- Click the current Branch Name (usually
mainormaster). - Select the desired branch from the list that appears at the top.
Creating a New Branch
- Open the Command Palette (
Ctrl/Cmd + Shift + P). - Select Git: Create Branch.
- Enter a descriptive name (e.g.,
feature/login-logicorfix/header-padding).
Best Practices & Recommendations
Based on the technical workflows outlined above, here are expert recommendations to maintain a clean repository:
- Atomic Commits: Make small, frequent commits that address a single logic change. This makes debugging and rollbacks significantly easier for Architects and Senior Devs to review.
- Standardized Branch Naming: Use prefixes for branches to help Admins and Analysts track progress (e.g.,
feat/,bugfix/,docs/, orrefactor/). - The
.gitignoreEssential: Before your first push, ensure you have a.gitignorefile in your root directory. This prevents sensitive environment variables (.env) or bulkynode_modulesfrom being uploaded to GitHub. - Sync Before Starting: Always “Pull” the latest changes from the remote repository before creating a new branch to avoid complex merge conflicts later.