How to Set Up a Salesforce Agentforce Contact Center: A Complete Technical Guide
Setting up a robust, AI-driven contact center requires precise orchestration between Salesforce’s routing engines, user permissions, and telephony settings. If you are an Architect, Admin, or Developer tasked with implementing Salesforce Agentforce for voice channels, getting the initial configuration right is critical for a seamless handoff between AI agents and human representatives.
This guide walks you through the exact steps to configure an Agentforce Contact Center, from provisioning your Agentforce Service Agent to configuring Omni-Channel flows and claiming your telephony numbers.
Phase 1: Agent and Routing Preparation
Before touching telephony settings, you need to establish the foundational routing logic and create the AI agent that will handle initial interactions.
1. Create and Activate Your Agentforce Service Agent
- Develop your Agentforce Service Agent within Salesforce.
- Once configured to your business requirements, Activate the Agent.
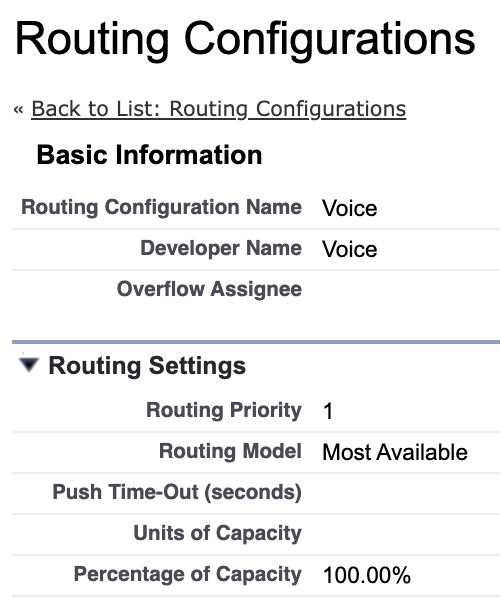
2. Create a Routing Configuration
- Navigate to Setup > Omni-Channel > Routing Configurations and click the New button.
- Under Routing Settings > Routing Model, use the dropdown to select either Least Active or Most Available.
- Because this configuration is dedicated to the Voice Channel, set the Percentage of Capacity to 100.00%.
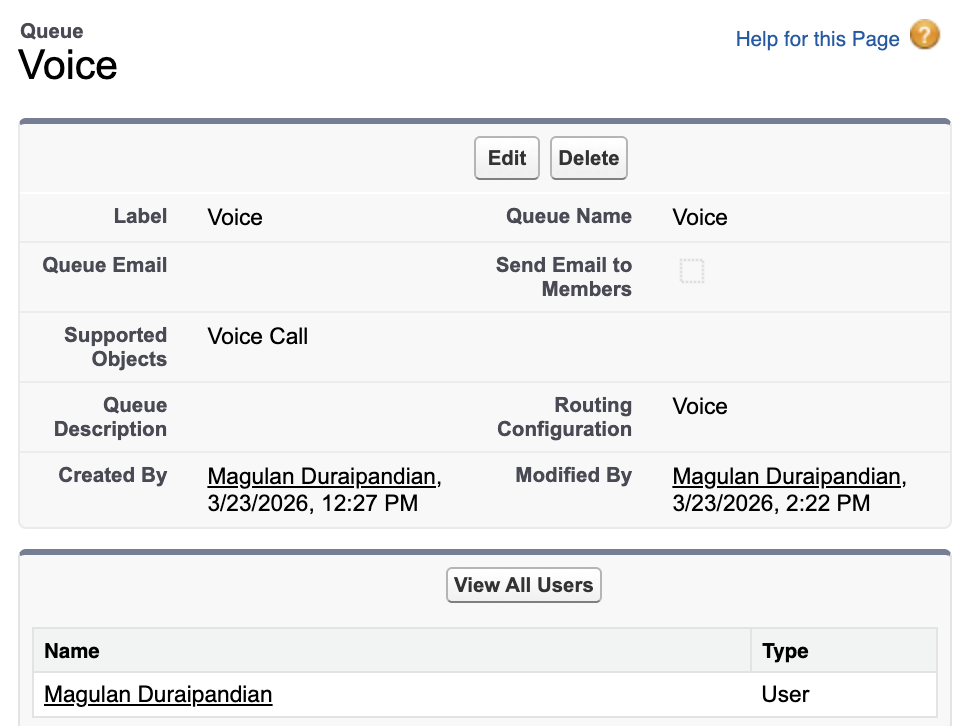
3. Create a Fallback and Escalation Queue
Create a queue tied to the routing configuration you just built.
- In Supported Objects, select Voice Call.
- Add the specific users to the queue who are equipped to handle Voice Calls.
Architect Note: This queue serves a dual purpose. It will be used in your Omni-Channel flow as a fallback backup if the Route Work Action fails to route to the Agentforce Service Agent. It will also be the target for escalations when a human touch is required.
4. Build Your Omni-Channel Flows
You will need two distinct Omni-Channel flows to handle the lifecycle of the call:
- Initial Routing Flow: Create an Omni-Channel Flow using the Route Work standard action to route the incoming Voice Call directly to the Agentforce Service Agent.
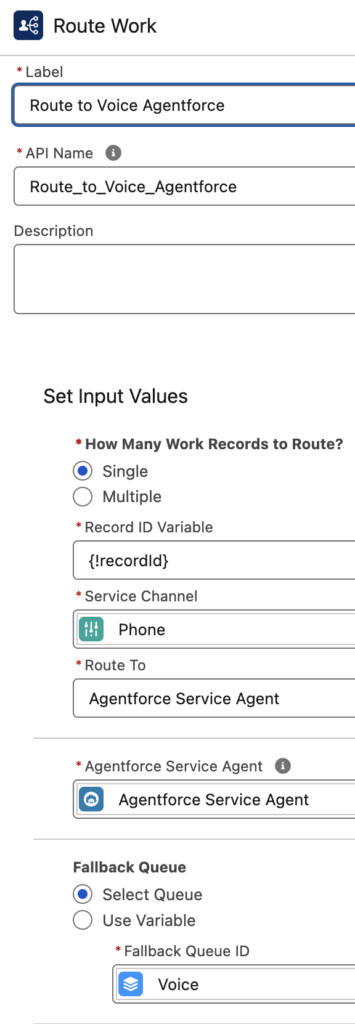
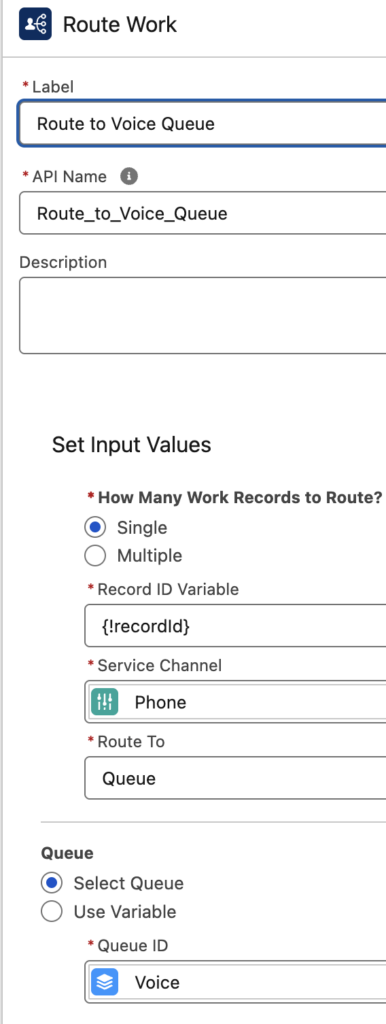
- Escalation Flow: Create a second Omni-Channel Flow using the Route Work standard action to route the Voice Call to your previously created Queue, an Agent, or specific Skills. This flow handles escalating the call from the Agentforce Agent to a Human Service Agent for further assistance.
Phase 2: User Permissions
Your administrative users need the correct permission sets to access and configure Voice and Communication Channels.
- Go to Setup > Users > Find and Select Your Admin User.
- Click on Permission Set Assignments at the top of the page (or scroll down to that related list) and click Edit Assignments.
- In the Available Permission Sets column, find the following and click Add to move them to the Selected Permission Sets column:
- Agentforce Contact Center Admin (Salesforce Voice)
- Agentforce Contact Center Rep (Salesforce Voice)
- Agentforce Contact Center Supervisor (Salesforce Voice)
- Click Save.
- If you receive a pop-up message stating, “One or more of the selected permission sets include community settings…”, click OK.
- Refresh your browser to ensure the Communication Channels options become visible in the Setup menu.
Phase 3: Telephony & Channel Configuration
With routing and permissions in place, you can now procure your phone numbers and configure the Voice Channel.
1. Claim a Phone Number
- Go to Setup > Communication Channels.
- Click on New Number.
- Step 1: In the Procure New Numbers pop-up, select a Country (US or CA) and select 10-Digit Long Code as the Number Type. Click Next.
- Step 2: Search for and select an Area Code, then select a Phone Number. Click Next.
- Step 3: Review your selection and click Finish.
- Back on the Communication Channels page, click on the Numbers tab. Refresh your browser tab to confirm the status of the claimed number is Live. (If it is not Live, click the provisioned number and click Refresh Number Status).
2. Configure the Voice Channel
- Click on New Channel and click Start in the pop-up.
- Select Voice (this will auto-advance to the next screen). Review the notes and click Next.
- Use the dropdown to select the Phone Number you just claimed.
- For the Call Routing Type, select Omni-Flow.
- Select the Initial Routing Flow you created earlier to route Voice Calls to the Agentforce Service Agent.
- Click Next, then click Done.
3. Set Caller Line Identification (CLI) for Outbound Calling
- From the Communication Channels page, click the Numbers tab and select your claimed phone number.
- Click Edit and check the box next to Set number as the default Caller Line Identification (CLI) for outgoing calls.
- Click Save, then click Confirm on the pop-up.
4. Enable Call Recording & Transcription
- Navigate to Setup > Call Recording and Transcription.
- Toggle both settings to Active.
Phase 4: Activation and Agent Connection
It is time to tie the telephony infrastructure directly into your Agentforce Service Agent and go live.
1. Activate the Voice Channel
- Go to Setup > Communication Channels.
- Click the drop-down next to your newly created Voice channel, and click Edit.
- (Optional) Update the Channel Name. Click Save.
- Click Activate.
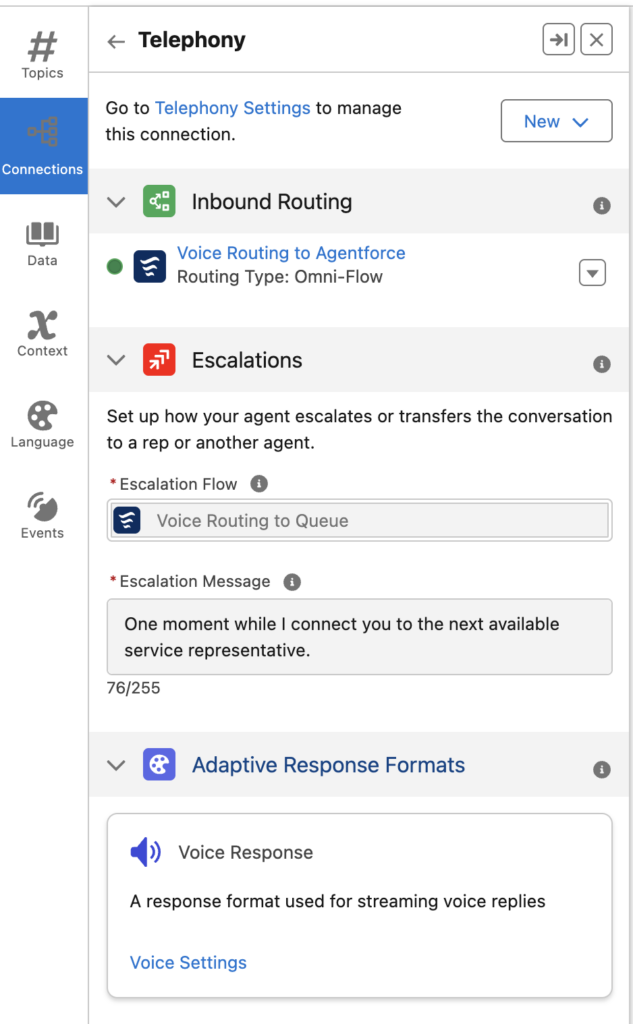
2. Configure Telephony in Agentforce Service Agent
- Open your Agentforce Service Agent.
- Deactivate the Agent.
- Navigate to the Connections tab.
- Click New and select Telephony.
- In the Inbound Routing section, you should see your Initial Omni-Channel Flow.
- In the Escalations section, locate the Escalation Flow setting and select your second Omni-Channel Flow (the one that routes to the human Queue).
- Activate the Agent.
3. Test Your Setup
Make a test call to the Procured Number. Verify that the call routes first to the Agentforce Service Agent and that escalation successfully routes to your human queue.
Agentforce and Data 360
Instead of customers navigating rigid IVR menus, Agentforce Voice routes calls directly to an intelligent agent that understands context, takes real-time actions in Salesforce, and resolves issues conversationally.
Data360 unifies your customer data into a single real-time profile, giving that AI agent the full context it needs to personalize every interaction.
Expert Recommendations & Best Practices
To ensure a resilient and maintainable architecture, keep the following best practices in mind during your setup:
- Mind Your Variables: In your Omni-Channel Flows, the
recordIdvariable is strictly case-sensitive. Ensure it is formatted exactly asrecordId(lowercase ‘r’, uppercase ‘I’) to prevent silent flow failures. - Design for Failure: Always assign human users to your backup queue. If the Omni-Channel Route Work Action fails to reach the Agentforce Service Agent due to capacity limits or unexpected errors, this queue ensures the customer’s call isn’t dropped.
- Capacity Planning: Because Voice Channels require real-time attention, setting the Percentage of Capacity to 100.00% is crucial. This ensures human agents aren’t overwhelmed by simultaneous voice calls and text-based chats.
- Test in Sandbox First: Telephony routing and AI agent handoffs can be difficult to debug in production. Always run your end-to-end tests (including successful AI resolution, AI-to-human escalation, and routing failures) in a Full or Partial Sandbox before deploying to Production.
Salesforce Help Article:
https://help.salesforce.com/s/articleView?id=service.support_channels.htm&type=5