Complete Guide: How to Connect Salesforce Agentforce Agent to Email-to-Case?
Salesforce Agentforce Service Agents represent a paradigm shift in customer service automation. Unlike standard auto-responders, these agents possess the capability to autonomously generate context-aware responses to customer email inquiries, consistently grounded in the trusted information contained within your Agentforce Data Libraries.
For Technical Architects, Developers, and Admins, integrating this capability into the standard Email-to-Case workflow is a high-value implementation. This guide details the technical configuration required to connect an Agentforce Service Agent to Email-to-Case, ensuring seamless autonomous handling of incoming tickets.
Prerequisites
Before configuring the connection, ensure you have the necessary permissions assigned to manage Agentforce Agents, Flows, and Email-to-Case settings within your Salesforce instance.
Step 1: Setup Email-to-Case
If not already configured, you must enable and set up the standard Email-to-Case functionality. This establishes the pipeline for converting incoming emails into Salesforce Case records.
- Navigate to Setup.
- Search for Email-to-Case.
- Enable Email-to-Case and configure your routing addresses.
- Verify that your email services address is active.
Step 2: Create Your Agentforce Service Agent
You need an active agent ready to handle the logic.
- Navigate to the Agentforce setup menu.
- Create a new Service Agent.
- Ensure the agent is linked to the appropriate Data Libraries to ground its responses in your organization’s knowledge base.
Step 3: Create a Salesforce Lightning Email Template
The Agentforce Agent requires a specific template structure to dynamically insert its generated response.
- Go to the Email Templates tab (or searching in the App Launcher).
- Create a new Lightning Email Template.
- Crucial Step: In the Email Template Body, use the exact format below. This allows the Agent to inject the AI-generated answer and the mandatory legal disclosure.
Email Template Body:
[[[GENERATED_CONTENT]]]

[[[LEGAL_DISCLOSURE]]]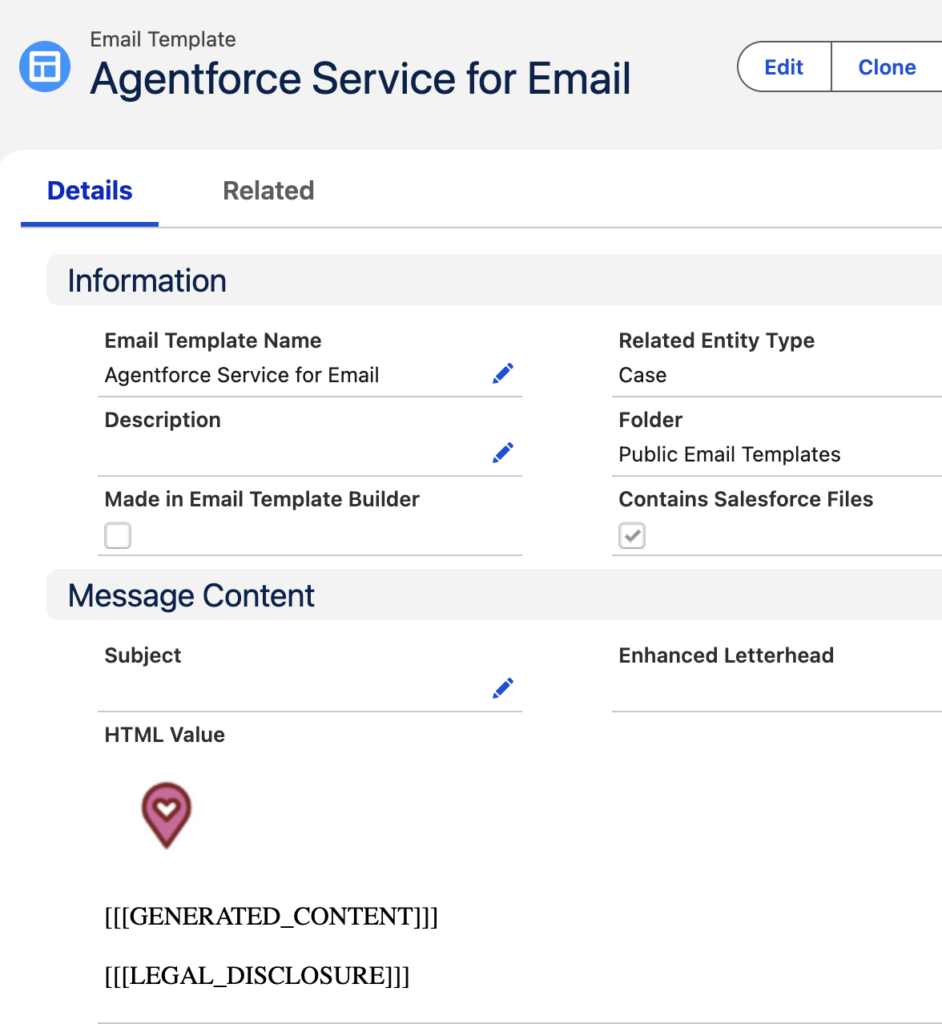
Step 4: Configure Agentforce for Service on Email
Now, you must bridge the gap between the Agent and the email channel.
- In Salesforce Setup, navigate to Agentforce for Service on Email.
- Click to create a new Email Configuration.
- Assign this configuration to your specific Agentforce Service Agent.
- Save the configuration.
Step 5: Link Configuration to Email-to-Case
Once the specific Agent configuration is created, it must be applied to your Email-to-Case settings.
- Return to your Email-to-Case configuration settings.
- Locate the section labeled Agentforce Service Agent Settings.
- Select the email configuration you created in Step 4.
Step 6: Assign Cases to the Agentforce Service Agent
For the Agent to process the email, the resulting Case record must be owned by the Agent user (API Name: EinsteinServiceAgent).
There are three primary methods to achieve this. Choose the method that best fits your organization’s routing complexity.
Method A: Using an Omni-Channel Flow (Recommended for Complex Logic)
This method is ideal for enterprise environments requiring complex routing logic, leveraging the full power of Salesforce Flow.
- Create or open your Omni-Channel Flow.
- Add a Route Work action element.
- Configure the action parameters:
- Route To: Select
Agent. - Agent: Choose the
Agentforce Service Agentuser (API Name:EinsteinServiceAgent).
- Route To: Select
- This directs the case record to be processed immediately by the designated Agent.
Method B: Using a Case Assignment Rule
This utilizes standard Salesforce automation to assign ownership based on specific criteria (e.g., specific email subjects, origins, or priorities).
- Navigate to Case Assignment Rules in Setup.
- Create or edit a rule entry.
- Define your desired criteria (e.g.,
Case Origin equals Email). - In “Step 3: Select the user or queue to assign the case to”:
- Select User from the dropdown list.
- Use the lookup field to find and select the Agentforce Service Agent user (
EinsteinServiceAgent).
Method C: Using the Default Email-to-Case Configuration
This is the most direct method, setting the Agent as the default owner for all cases created via a specific routing address.
- Go to the Email-to-Case settings page.
- Under the Case Settings section:
- Set the Case Owner to
User. - Select the Agentforce Service Agent user (
EinsteinServiceAgent).
- Set the Case Owner to
- In the Agentforce Service Agent Settings section, verify you have selected the correct Configuration Name.
Step 7: Verification and Testing
To ensure the pipeline is functioning:
- Send a test email to the designated Email-to-Case “Email Services Address”.
- Monitor the Case creation in Salesforce.
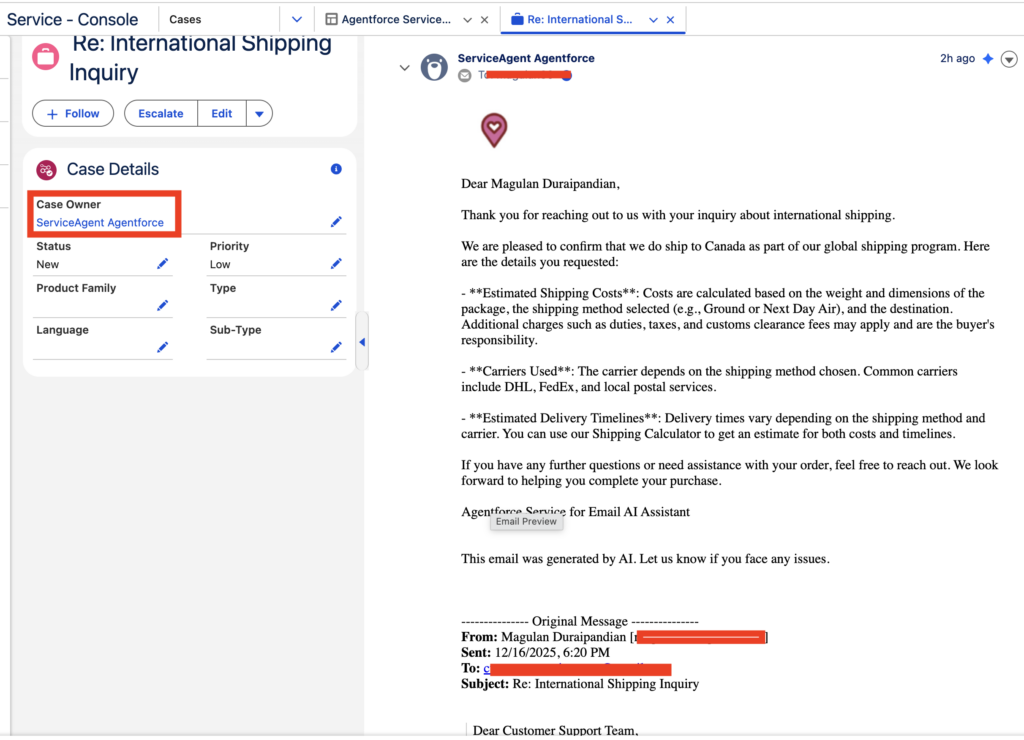
- Verify that the Case Owner is the
EinsteinServiceAgent. - Wait for the autonomous reply. The Salesforce Agentforce Service Agent will respond to the email using the generated content grounded in your data.
Salesforce Article:
https://help.salesforce.com/s/articleView?id=ai.agent_email_parent.htm&type=5