Turbocharge Agentforce: Find Similar Salesforce Cases fast with Data Cloud (Step-by-Step Guide) 🚀
Service agents need to find relevant, resolved cases quickly to deliver faster, more consistent service. Imagine an agent struggling with a complex customer issue, only to realize the solution is buried in a closed case from last month. Salesforce Data Cloud offers a powerful solution, enabling agents in Agentforce (often the enhanced Service Console) to leverage a unified, indexed view of all your case data for powerful search capabilities.
This guide walks you through setting up a Data Cloud Search Index and a Prompt Template in Einstein Studio to instantly surface similar cases right within your agent’s workflow.
The Power of Unified Case Data
By pulling your Salesforce Case data into Data Cloud, you unlock advanced search and retrieval capabilities. This method is far more efficient than standard lookups, especially when dealing with large volumes of unstructured data like case descriptions.
Section 1: Data Preparation in Data Cloud ☁️
The first step is to bring your Case data into Data Cloud and map it to a standard object.
1. Create a Data Stream for Cases
- Navigate to the Data Streams tab in Data Cloud.
- Click New, then select Salesforce CRM as the source.
- Click View Objects and select the Case object.
- Select the necessary Fields for the Case object (e.g., Case Number, Subject, Description, IsClosed, Record ID).
- Optional Filter: For a refined index, you might want to focus on resolved cases. You can set a filter here—for example, IsClosed is True—to only include closed cases in your index.
- Ensure the Data Stream for the Case object becomes Active. Wait for the initial run to complete.
2. Data Mapping
- Open the Data Stream you just created and click the Start Button on the Data Mapping section.
- Map your Case object fields to the standard Case Data Model Object (DMO).
Section 2: Building the Search Index 🔎
A Search Index is what allows Einstein’s retrieval tools to quickly find relevant information.
- Go to the Search Index tab in Data Cloud.
- Click the New button.
- Select “Advanced Step”.
- Select the Case Data Model Object (DMO) you mapped your data to.
- Wait: The system needs time to process the data. Monitor the index until the “Search Index Last Run Status” shows as Completed.
Section 3: Configuring the Retriever in Einstein Studio 🧠
The Retriever is the component that uses the Search Index to fetch relevant documents (in this case, Cases).
1. Create a Custom Retriever
- Go to the Einstein Studio tab.
- Select Retrievers.
- (Optional) If a default retriever was created, you may delete it for a cleaner setup.
- Click New Retriever.
- Select “Individual Retriever”.
- Configure the settings:
- Source: Data Cloud
- Data Space: Select your active Data Space
- Data Model: Case
- Search Index: Select the Search Index you created in the previous section.
- Select Fields to return: Ensure you select key fields like Case Number, Subject, Description, and the Record ID (often named
SourceRecordId__cin Data Cloud).
Section 4: Creating the Flex Prompt Template 📝
The Prompt Template tells the AI how to use the retrieved data and how to format the output for the agent.
1. Design the Prompt
- Go to the Einstein Studio tab and select Prompt Templates.
- Create a Flex Prompt Template.
- In the Inputs section, add an input named
Search_Stringwith the Source Type set to “Free Text”. This is what the agent will enter to search. - Use the following Prompt Template Content. This instructs the AI to search the index and format the results in a rich-text, actionable manner.
You are a support agent looking for other Similar Cases. Search {!$Input:Search_String} in {!$EinsteinSearch:Retriever_API_Name.results} to find similar cases.

Display the results as a bulleted list. For each similar case found, use the following rich-text format, ensuring the Case Number is a clickable hyperlink:

- Case: <a href="https://your-salesforce-domain.develop.lightning.force.com/lightning/r/Case/{SourceRecordId__c}/view" target="_blank">{CaseNumber}</a>
  Subject: {Subject}
  Description: {Description}
- Important: Replace
Retriever_API_Namewith the actual API name of your Retriever (e.g.,All_Cases_Retriever_1Cx_RFe87268b5d) and replace the placeholder URL with your actual Agentforce or Service Console domain URL.
2. Trust the URL
- Navigate to Setup in your Salesforce org.
- Search for and select Trusted URLs.
- Add your URL used in the Prompt Template to the list. This is crucial for enabling the secure hyperlink within the Agentforce console.
Section 5: Activating the Action in Agentforce 🤝
The final step is to make this powerful tool accessible to your agents via an Agent Action.
- Go to the Agentforce Topic (or your relevant Service Cloud Agent Model setup).
- Create a new Agent Action.
- Set the Reference Action Type to “Prompt Template” and select the template you just created.
- Provide clear Agentforce Topic Instruction for the AI to follow, such as:
Use Find Similar Case action if the user requests to find similar cases. Display the result in Rich Text format only.
Agent Productivity Unlocked!
Your agents are now empowered! When a service representative asks about an issue, the agent can trigger the Find Similar Case action, enter a brief description (the Search_String), and the AI will use the Data Cloud Search Index to instantly return a rich-text list of resolved, similar cases. Each result includes a direct, clickable link to the original case, significantly boosting resolution speed and knowledge reuse. This is the true power of Data Cloud and Einstein AI combined in Agentforce!
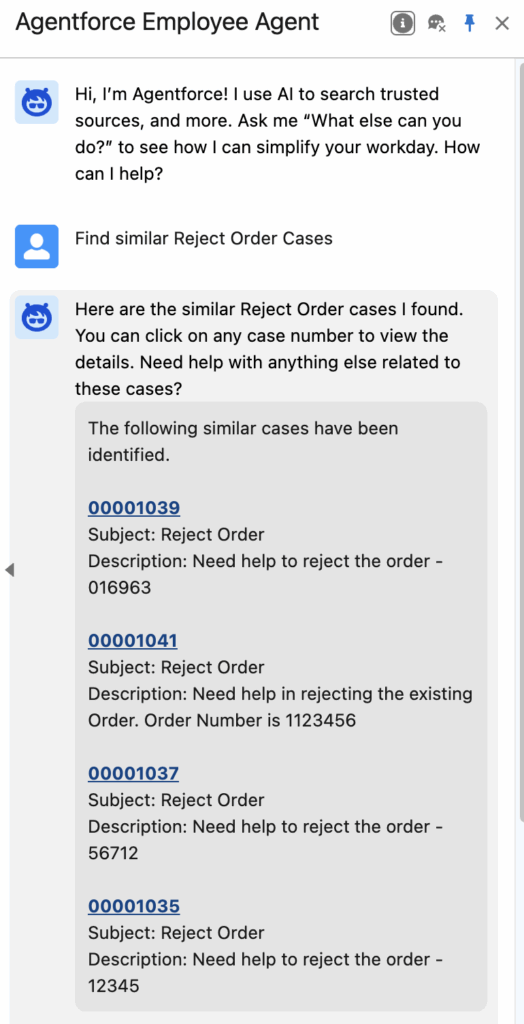
You can make use of Find Similar Interactions standard agent action also for this use case.