
In today’s fast-paced digital workplace, efficiency hinges on seamless integration between critical platforms. Salesforce Agentforce empowers support agents by providing AI-driven assistance directly within their workflow. By connecting Agentforce to Slack, you can unlock powerful new capabilities, including the ability to search public Slack conversations directly from the agent interface. This guide will walk you through configuring your Agentforce Agent to search Slack, streamlining information retrieval and improving resolution times.
Step 1: Configure Salesforce Agentforce and Slack Connectivity
Before enabling Slack search, you must establish the connection between your Salesforce organization and your Slack workspace. This foundational step ensures that Agentforce can communicate securely with Slack.
Follow these configuration steps:
- Create the Agentforce Agent: Begin by setting up the core Agentforce Agent within your Salesforce environment.
- Install Slack Platform Connector: Install the necessary “Slack platform connector to Salesforce” package to facilitate communication between the two platforms.
- Connect Salesforce Org to Slack: Navigate to the Slack administration settings and use the “Manage Salesforce Organizations” option to link your Salesforce instance.
- Add Slack User to Salesforce Org: Ensure that the user accounts are properly mapped between Slack and Salesforce for authentication purposes.
- Authorize Salesforce from Slack: Complete the authorization flow within Slack to grant Salesforce the necessary permissions.
- Add Slack Connected App: In the Salesforce setup for your Agentforce Agent, add the corresponding Slack Connected App to link the specific agent capabilities.
- Install Agent in Slack: Review the configuration and install the Agentforce agent into your Slack workspace using the “Manage Agentforce” options in Slack.
- Access Agentforce in Slack: Once installed, verify that the Agentforce icon is available in Slack, confirming the basic integration is active.
Step 2: Add “General Slack” Topic to the Salesforce Agentforce Agent
To enable the search functionality, you need to configure your Agentforce Agent to understand requests related to Slack search. This is achieved by adding a specific topic to the agent’s capabilities.
- Open the Agentforce Agent in the Builder.
- Add “General Slack” Topic to the Salesforce Agentforce Agent.
Step 3: Activate and Test the Integration
With the configuration complete and the topic added, the final step is to activate the updated agent and test the functionality to ensure it works as expected.
- Activate Agent: Ensure any changes made to the Agentforce Agent configuration are saved and activated. If you want to do changes to an active agent, you need to deactivate and reactivate it.
- Test with Sample Prompt: Open the Agentforce interface where an agent would typically interact with it. Use a clear, direct prompt to test the new Slack search capability.
Sample Prompt Example:
Please search Slack on Contract renewal
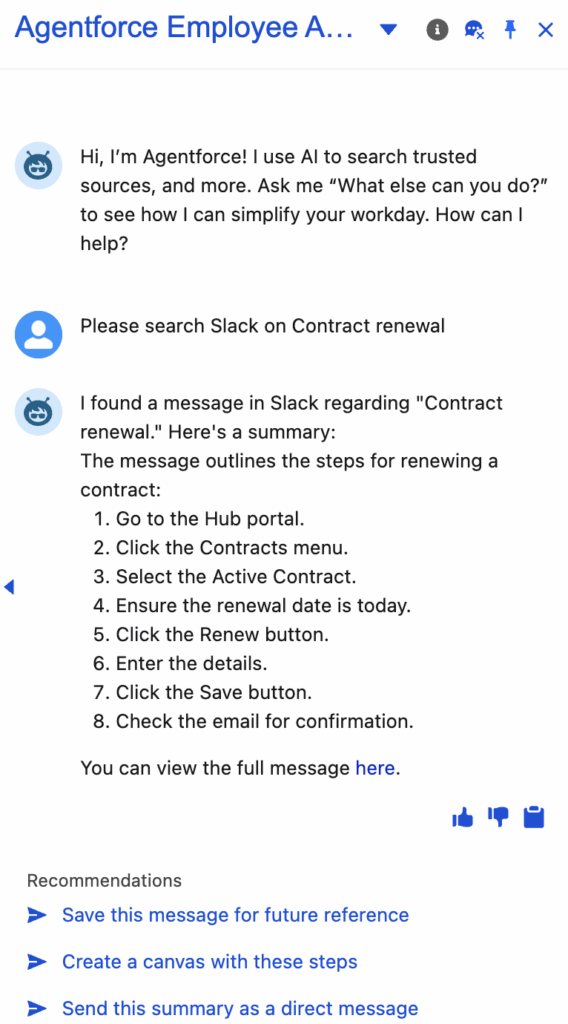
The agent, recognizing the intent through the “General Slack” topic, should now query your public Slack channels for messages, files, and conversations related to “Contract renewal” and present the findings directly in the agent interface.
Conclusion
Integrating Slack search directly into Salesforce Agentforce significantly reduces context switching for support agents. By providing immediate access to relevant conversations and information stored in Slack, you empower your team to resolve customer inquiries faster and more accurately. This simple configuration bridges the gap between collaboration and service, creating a more unified and productive agent experience.
It gives us the flexibility to search Slack messages directly from Salesforce Agentforce Agent with point and click configuration. Try it out today!!!
Salesforce Article:
https://help.salesforce.com/s/articleView?id=ai.copilot_actions_ref_slack_search.htm&type=5