
Supercharge Your Salesforce Dev: A Quickstart Guide to Cursor IDE 🚀
Are you a Salesforce developer looking to level up your productivity? Cursor is a powerful, AI-first code editor that’s gaining popularity for its ability to streamline development workflows. If you’re familiar with VS Code, you’ll feel right at home with Cursor, as it’s built on the same foundation, but with deep AI integration that sets it apart.
This guide will walk you through the simple steps to get Cursor IDE set up for your Salesforce projects, from installation to project creation.
Step 1: Download and Install Cursor IDE
First, you’ll need to download the Cursor IDE application.
- Go to the official Cursor downloads page: https://cursor.com/en/downloads.
- Select the version that matches your operating system (Windows, macOS, or Linux) and download the installer.
- Once the download is complete, run the installer and follow the on-screen prompts to install the application.
Step 2: Install the Salesforce Extension Pack
A core part of setting up any IDE for Salesforce is installing the right extensions. The Salesforce Extension Pack is essential for working with Salesforce metadata and APIs.
- Open the Cursor application.
- Go to View > Extensions (or use the shortcut
Ctrl+Shift+Xon Windows/Linux orCmd+Shift+Xon macOS). - In the search bar, type “Salesforce Extension Pack“.
- Find the official extension pack and click the Install button. This pack includes all the necessary tools for Apex, Lightning Web Components (LWC), Visualforce, and more.


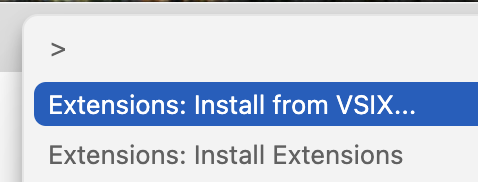
If you’re unable to search or view the Salesforce Extension Pack, download it from the link and upload it in your Cursor IDE using (command + shift + p) and use the command Extensions: Install using VSIX.
Step 3: Install the Salesforce CLI
The Salesforce Command Line Interface (CLI) is a crucial tool that lets you interact with your Salesforce orgs directly from your terminal or IDE. It enables you to create projects, authorize orgs, and deploy code.
- Navigate to the Salesforce CLI downloads page: https://developer.salesforce.com/tools/sfdxcli.
- Download the installer for your specific operating system.
- Run the installer and complete the installation process.
- After installation, restart your computer or close and reopen Cursor IDE and your terminal to ensure the CLI is properly configured in your system’s path. You can verify the installation by opening a terminal and running the command
sf --version.
Step 4: Create a Salesforce Project
With Cursor IDE and the Salesforce CLI now installed, you’re ready to create a new project. The process is very similar to VS Code.
- Open the Command Palette in Cursor with
Ctrl+Shift+P(Windows/Linux) orCmd+Shift+P(macOS). - Type
SFDX: Create Project with Manifestand select it from the list. - Choose a project template, such as
StandardorEmpty. - Give your project a name and select a location to save it.
Once the project is created, you can authorize your Salesforce org and begin creating or updating your metadata!
Conclusion: Get Started with AI-Powered Development
By following these steps, you’ve successfully set up Cursor IDE for your Salesforce development. The combination of Cursor’s AI capabilities and the robust Salesforce extensions will help you write better code, debug faster, and ultimately, become a more efficient developer.
Happy coding! 👩💻👨💻