Display Queue Position in Salesforce Enhanced Chat: Complete Technical Guide for Admins & Developers
In this Blog Post, you will learn how to configure queue position notifications in Salesforce Enhanced Chat with this step-by-step technical guide. Improve customer experience and agent efficiency with real-time queue status updates. Perfect for Salesforce admins, developers, and architects.
Table of Contents
- Introduction
- Overview of Queue Position in Enhanced Chat
- Prerequisites
- Step-by-Step Configuration Guide
- Technical Considerations
- Recommendations & Best Practices
- Troubleshooting Common Issues
- FAQ
- Conclusion
1. Introduction
Configuring queue position in Salesforce Enhanced Chat is a critical enhancement for organizations looking to improve customer experience while maintaining transparency during peak support hours. This technical guide walks Salesforce administrators, developers, and architects through the precise configuration steps to enable real-time queue position notifications for customers waiting to connect with agents.
Unlike standard chat implementations, Salesforce Enhanced Chat’s queue position feature provides customers with immediate visibility into their wait status, reducing abandonment rates and improving satisfaction scores. This functionality is particularly valuable for enterprise deployments handling high-volume chat traffic across multiple service channels.
2. Overview of Queue Position in Enhanced Chat
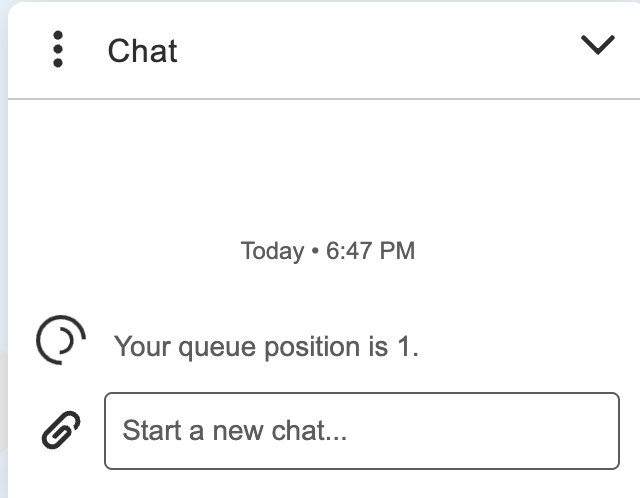
The Queue Position notification feature in Salesforce Enhanced Chat displays a customer’s real-time position in the waiting line before an agent accepts the chat request. This capability leverages the Messaging Settings framework integrated with Embedded Service Deployments.
Key Benefits:
- Transparency: Customers know exactly where they stand in the queue
- Reduced Abandonment: Visible wait status decreases premature chat termination
- Enhanced UX: Professional, informative waiting experience
- Scalability: Works across multiple messaging channels and queues
3. Prerequisites
Before configuring queue position, ensure you have:
- Salesforce Edition: Enterprise, Unlimited, or Developer Edition with Service Cloud
- Permissions: “Customize Application” and “Manage Messaging Configuration”
- Configuration: Active Embedded Service Deployment for Enhanced Chat
- Messaging Channel: Configured Messaging Channel tied to your deployment
- Queue Setup: Active chat queue with assigned agents
4. Step-by-Step Configuration Guide
Follow these exact configuration steps to enable queue position notifications:
Step 1: Access Salesforce Setup
Navigate to Setup in your Salesforce org. Use the Quick Find box to streamline access to configuration settings.
Step 2: Navigate to Messaging Settings
In Setup, enter “Messaging Settings” in the Quick Find box and select it from the results. This opens the Messaging Configuration panel.
Step 3: Select Your Messaging Channel
Locate the Messaging Channel tied to your Embedded Service Deployment for Enhanced Chat. Click the Edit option from the action menu (down arrow) on the channel record.
Step 4: Enable Queue Position Notification
Under the “Queue Wait Time and Position” section, locate the Notification dropdown field. Select “Queue Position” from the available options.

Step 5: Save Configuration
Click the Save button to commit your changes. The system will validate the configuration and update the messaging channel metadata.
Step 6: Publish Embedded Service Deployment
Return to your Embedded Service Deployment configuration and publish the deployment. This action pushes the updated settings to your production chat interface.
Step 7: Validate Functionality
Once publishing is complete, initiate a test chat session during a period of queue activity. Verify that queue position notifications display correctly to end users.
5. Technical Considerations
Architecture Impact: Enabling queue position utilizes the real-time updates to the chat widget.
Performance: The feature adds minimal payload to chat initialization but increases server-side polling frequency.
Customization: Queue position messaging can be customized using Custom Labels for multilingual support.
Limitations:
- Does not display estimated wait time (only position)
- Requires active agent presence in queue
- This post is not on deprecated Live Agent configurations
6. Recommendations & Best Practices
Based on the configuration workflow, implement these technical best practices:
Configuration Best Practices:
- Test in Sandbox First: Always validate queue position behavior in a full-copy sandbox before production deployment
- Staggered Rollout: Enable for a single messaging channel initially to monitor performance impact
- Agent Staffing: Ensure minimum 2-3 agents are active in queue before enabling to avoid position 1 delays
7. Troubleshooting Common Issues
| Issue | Cause | Resolution |
|---|---|---|
| Queue position not displaying | Embedded Service Deployment not published | Republish deployment and clear browser cache |
| Position always shows “1” | Single queue assignment misconfiguration | Verify queue routing configuration and agent presence |
| Notification not in user language | Custom Label not translated | Configure Translation Workbench for QueuePositionMessage |
8. FAQ
Q: Can queue position be displayed alongside estimated wait time?
A: Currently, Salesforce supports either queue position OR estimated wait time notification, not both simultaneously.
Q: What permissions are needed to configure this?
A: Requires “Customize Application” and “Manage Messaging Configuration” system permissions.
Q: Does enabling queue position impact chat routing performance?
A: No measurable impact on routing speed;
9. Conclusion
Implementing queue position in Salesforce Enhanced Chat is a straightforward yet powerful configuration that significantly enhances customer experience. By following the seven-step process outlined above, technical teams can deploy this feature with minimal development effort while achieving measurable improvements in chat engagement metrics.