How to Set Up Salesforce Agent Quick Actions: A Step-by-Step Guide
In the rapidly evolving world of Salesforce AI, efficiency is everything. The introduction of Salesforce Agent Quick Actions is a game-changer for admins and users alike. This feature allows users to invoke Agentforce directly from record pages, streamlining workflows and bringing the power of AI right to where the work happens.
By clicking an Agent Quick Action, the Agentforce panel opens instantly, directing the Agent to use a specific topic based on the underlying utterance. This eliminates the need for users to manually open the Agentforce panel and type out complex prompts, saving valuable clicks and reducing friction.
In this guide, we’ll walk you through how to configure an Agent Quick Action to summarize records instantly.
Why Use Agent Quick Actions?
- Saves Time: Reduces the number of clicks required to invoke Agentforce.
- Context Aware: Passes relevant record context to the Agent immediately.
- Standardization: Ensures users invoke the Agent with consistent, high-quality prompts.
Step-by-Step Implementation Guide
Follow these steps to enable Agent Quick Actions in your Salesforce org.
1. Navigate to Object Manager
Start by logging into your Salesforce Setup. Go to the Object Manager tab.
2. Select Your Object
Choose the object where you want the action to reside (e.g., Account, Contact, or Case).
3. Create the Action
- Click on Buttons, Links, and Actions in the left-hand sidebar.
- Click the New Action button.
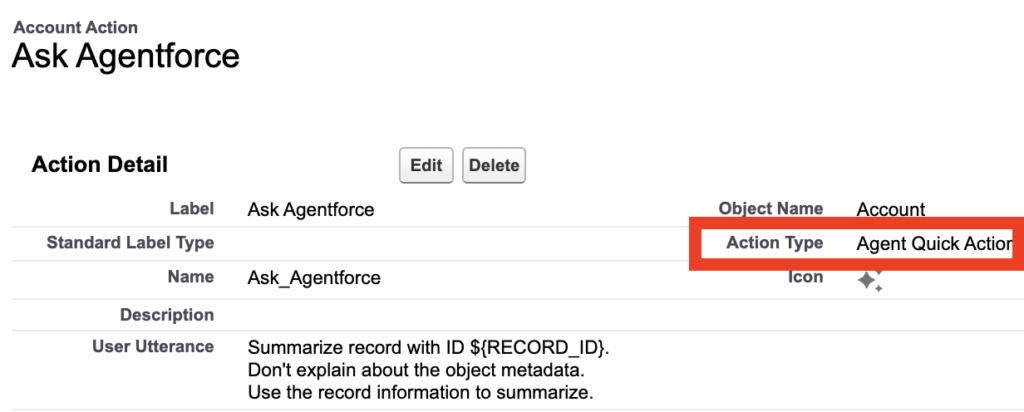
- Crucial Step: In the “Action Type” dropdown, select Agent Quick Action.
4. Configure Action Details
Give your action a clear Label and Name.
- Label: Ask Agentforce
- Name: Ask_Agentforce
5. Define the Prompt (User Utterance)
This is where you tell the Agent what to do when the button is clicked. You will enter your instructions in the “Agent Utterance” field.
Content to consider:
Summarize record with ID ${RECORD_ID}. Don't explain about the object metadata. Use the record information to summarize.
You can refer other fields like Type and Description instead of referencing the entire record too.
${RECORD_TYPE}
${RECORD_DESCRIPTION}
6. Add to Page Layout
Once the action is created, you must expose it to your users:
- Standard Layouts: Go to “Page Layouts,” select your layout, and drag the new action into the “Salesforce Mobile and Lightning Experience Actions” section.
- Dynamic Actions: If you are using a Lightning Record Page with Dynamic Actions enabled, open the page in the Lightning App Builder. Click on the Highlights Panel and add your new Agent Quick Action there.
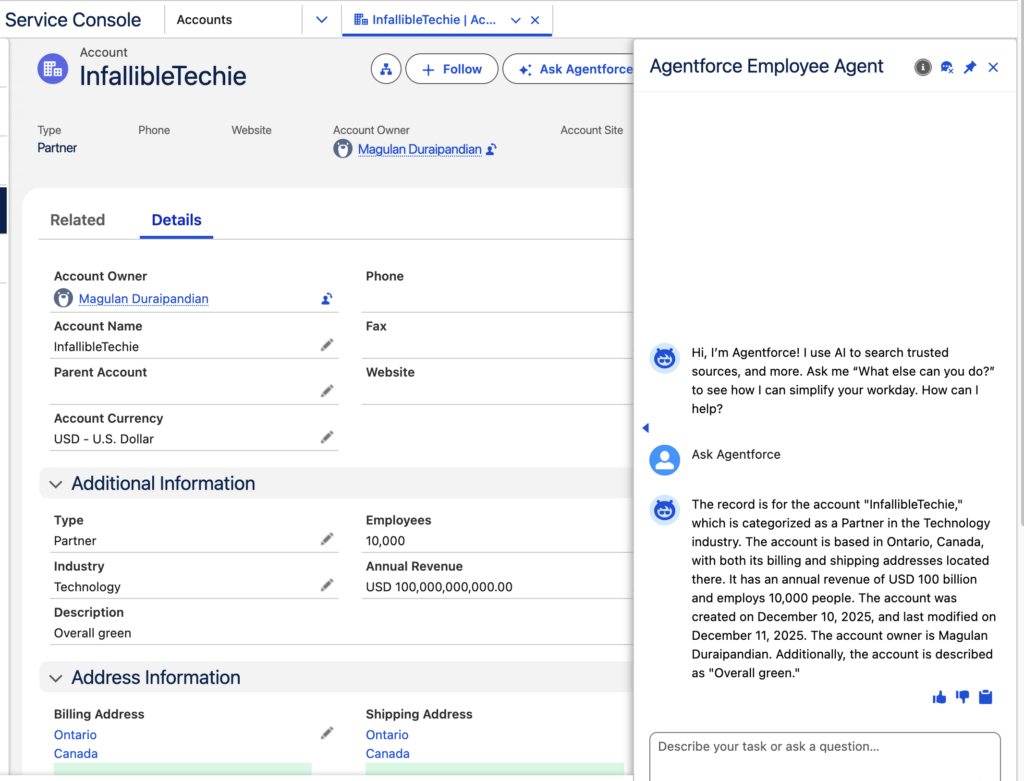
7. Test the Action
Open a record for the object you configured. Click your new “Summarize Record” button. The Agentforce panel should slide out and immediately begin processing the summary request for that specific record.
Salesforce Article:
https://help.salesforce.com/s/articleView?id=platform.agent_quick_actions.htm&type=5