Boost Customer Experience: Greet Customers by Name in Salesforce Agentforce
In the world of customer service, personalization is no longer a luxury—it’s an expectation. A simple greeting that uses a customer’s name instantly transforms a generic interaction into a personal one, significantly boosting customer satisfaction (CSAT) and overall loyalty.
If you are using Salesforce Agentforce (specifically Messaging for In-App and Web), you can easily implement this powerful personalization using Context Variables. This post will walk you through the simple, three-step process to configure your service agent to greet every verified customer by their name in the welcome message.
Why Personalized Greetings Matter
- Higher Customer Trust: Addressing a customer by name builds immediate rapport and trust.
- Seamless Experience: It proves that the system recognized and verified the user.
- Improved CSAT Scores: Personalization is a key driver for positive feedback and high service ratings.
3 Steps to Greet Customers by Name in Salesforce Agentforce
This guide assumes you have User Verification configured for your Enhanced Chat (Messaging for In-App and Web), which ensures the Messaging End User Name is always populated.
Step 1: Create a Custom Field on the Messaging Session Object
The first step is to create a field that pulls the customer’s name from the established Messaging User record.
- Navigate to Setup and go to Object Manager.
- Find and select the Messaging Session object.
- Create a New Custom Field.
- Select Formula as the Data Type.
- Set the Field Label (e.g., Visitor Name) and the Field Name (e.g.,
Visitor_Name__c). - The Formula Return Type should be Text.
- Use the following formula:
MessagingEndUser.Name- Tip: This formula navigates the relationship from the Messaging Session record to the related Messaging End User record to retrieve the standard
Namefield.
- Tip: This formula navigates the relationship from the Messaging Session record to the related Messaging End User record to retrieve the standard
Step 2: Include the Custom Field in Context Variables
Now that you have the name field, you need to expose it for use in your welcome messages by adding it to your Context Variables.
- In Setup, search for and navigate to Messaging Settings.
- Find the relevant Messaging Channel and click Edit.
- Scroll down to the Context Variables section.
- Click Add Context Variable.
- Map the context variable to the custom field you just created:
- Context Variable Name: Choose a simple, relevant name, like
Visitor_Name. - Field: Select the custom field you created,
Messaging Session.Visitor_Name__c.
- Context Variable Name: Choose a simple, relevant name, like
Step 3: Use the Context Variable in the Welcome Message
The final and most exciting step is integrating the Context Variable into your bot’s welcome flow!
- In Setup, navigate to Embedded Service.
- Select your Deployment and then go to Agentforce Settings (or Bot settings if you are using an older implementation).
- Locate the Welcome Message setting (or the first dialogue step of your bot).
- Use the following syntax to embed the Context Variable:
{!$Context.<CONTEXT_VARIABLE_NAME>}
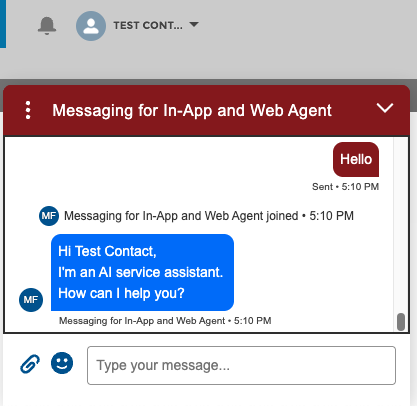
Sample Welcome Message:
Hi {!$Context.Visitor_Name}, I'm an AI service assistant. How can I help you today?
The Result: Personalized Service at Scale
By completing these three steps, your Salesforce Agentforce service assistant will deliver a personalized and professional greeting to every customer, like this:
“Hi John Smith, I’m an AI service assistant. How can I help you today?”
This small change is a massive leap forward in delivering a delightful digital customer service experience. Start implementing personalized greetings today and watch your CSAT scores rise!