Introduction: The Power of Persistent Conversations
Imagine a customer who has a problem, starts a chat with your support team, but has to drop off before it’s resolved. When they return, they have to start a new conversation and repeat every detail from scratch. It’s a frustrating experience that wastes time for both the customer and the agent.
The solution? Persistent, authenticated messaging sessions.
Salesforce Enhanced Chat (also known as Messaging for In-App and Web) offers a powerful way to solve this challenge. By connecting chat sessions to a user’s authenticated account in your Experience Cloud site, you can provide a seamless customer journey where their entire chat history is available to them, and to your service agents. This guide will walk you through the essential configuration steps to make this a reality.
Why This Is a Game-Changer for Customer Service
Displaying past messaging history isn’t just a nice-to-have feature; it’s a critical component of modern customer service.
- For the Customer: No more repeating information. They can pick up a conversation exactly where they left off, saving time and reducing frustration. It shows them that you value their time and remember their past interactions.
- For the Agent: Agents get immediate context. They can quickly review the customer’s previous conversations, understand the full history of the issue, and provide a faster, more informed resolution without asking the customer to re-explain everything.
- For Your Business: Improved customer satisfaction leads to higher loyalty and retention. It also increases agent efficiency, allowing your team to handle more inquiries per day.
The key to enabling this functionality lies in User Verification. This feature links an anonymous chat session to a specific, verified user record in Salesforce, such as a Contact or Person Account. Here are the two crucial configuration steps you need to take.
Step-by-Step Configuration Guide
To enable messaging session history for authenticated users, you need to configure both the Messaging Channel and the Embedded Messaging Component in your Experience Cloud site.
Step 1: Enable User Verification in the Messaging Channel
The first step is to tell your messaging channel that it should be prepared to verify and link incoming chats to a user account.
- From Salesforce Setup, use the Quick Find box to search for “Messaging Settings” and select it.
- Choose the Messaging for In-App and Web channel you wish to configure.
- Scroll down to the “User Verification” section.
- Click the Edit button.
- Enable the “Add User Verification” toggle.
- Save your changes.

What’s Happening Behind the Scenes?
By enabling “Credential-Based User Verification,” you’re instructing the Salesforce messaging service to use the user’s existing login session to verify their identity. This is a secure and simple method because it leverages the authentication already established when the user logged into your Experience Cloud site.
Step 2: Publish the Embedded Service Deployment
When we do any changes to the Messaging Channel, the Embedded Service Deployment tied to it should be published so that changes are considered.
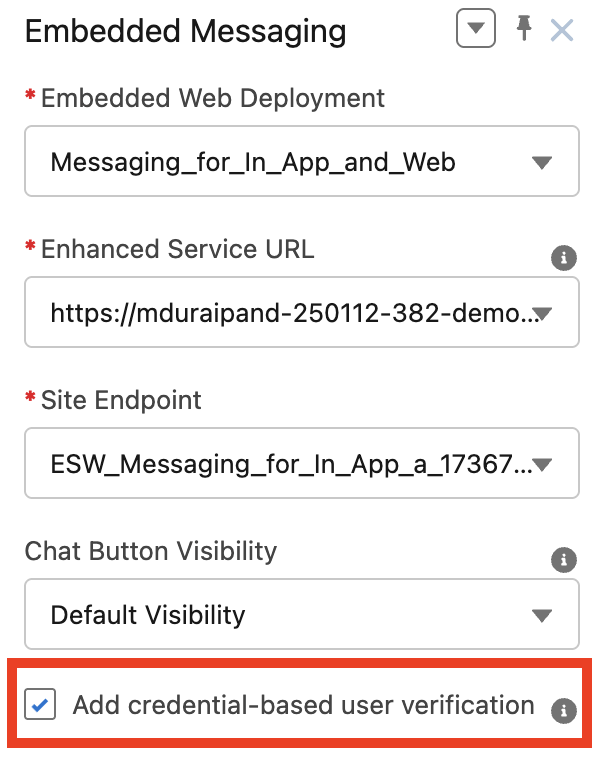
Step 3: Configure the Embedded Messaging Component in Experience Cloud
Now that the channel is ready, you need to configure the chat widget on your Experience Cloud site to take advantage of the user verification you just enabled.
- From Salesforce Setup, navigate to Digital Experiences > All Sites.
- Click Builder next to your relevant Experience Cloud site.
- In the Site Builder, locate the Embedded Messaging component (typically placed in the footer). If you haven’t added it yet, drag it onto the page from the “Components” menu.
- Click the Embedded Messaging component to open its properties panel.
- Check the box to “Add credential-based user verification”.
- Publish your Experience Cloud site to apply the changes.
What’s Happening Behind the Scenes?
This setting tells the chat widget that it is operating within an authenticated context. When a user clicks the chat icon, the component checks if they are logged in. If a valid session exists, it sends this verification information to the Messaging Channel, which then links the new or existing conversation to the correct Contact or Person Account record.
The Result: A Seamless User Experience
Once both of these settings are enabled, your authenticated users will enjoy a seamless support experience. When they initiate a new chat, the system will instantly recognize them and display their past conversation history. Any new messages will automatically be appended to their record, providing a complete, chronological view for both the customer and your service agents.
This simple yet powerful configuration significantly enhances the value of your Salesforce Service Cloud implementation and helps you build stronger, more efficient customer relationships.
Ready to Implement?
Providing a seamless, personalized customer experience is a top priority for any business. If you need help with your Salesforce implementation, from setting up Enhanced Chat to building a fully functional Experience Cloud site, our team of certified consultants is ready to help. Contact us today to get started!