
Beyond the Default: Why You Need Additional Data Spaces in Salesforce Data Cloud
If you’re diving into Salesforce Data Cloud, you’ve likely encountered the concept of a “Data Space.” By default, your organization comes with one, aptly named default. For many, this seems sufficient at first. But to truly harness the power of Data Cloud and build a scalable, secure, and organized data foundation, you must look beyond this single container.
Creating additional Data Spaces is not just an advanced feature; it’s a strategic necessity for any organization serious about data governance and segmentation. Let’s explore what Data Spaces are, why you need more than one, and how to create them.
What Exactly Are Salesforce Data Cloud Data Spaces?
Think of a Data Space as a logical partition or a container within your Data Cloud instance. Each Data Space houses its own set of data streams, data models, calculated insights, segments, and activations. It’s a way to create distinct, isolated environments for managing data, which is crucial for maintaining order and security.
The default space is your starting point, but as your implementation matures, it can quickly become cluttered, making it difficult to manage permissions and data for different teams or purposes.
4 Compelling Reasons to Create Additional Data Spaces
Moving beyond the default space is a sign of a maturing Data Cloud strategy. Here’s why it’s a game-changer:
1. Enhanced Data Governance and Regional Compliance
This is arguably the most critical reason. Different regions have different data privacy laws (like GDPR in Europe or CCPA in California). With separate Data Spaces, you can segregate data by region (e.g., EMEA_Production, NA_Marketing). This ensures that data from one region is processed according to its specific legal requirements and isn’t accidentally mixed with or exposed to users from another region.
2. Isolate Business Units or Brands
Does your company operate multiple brands or have distinct business units like Sales, Service, and Marketing? Assigning each a dedicated Data Space prevents cross-contamination of data. Your marketing team can build segments in their Marketing_DS without sifting through service-case data, and your sales team’s data models in their Sales_Ops_DS remain clean and focused on their objectives.
3. Streamlined Development and Testing (Dev/QA)
You wouldn’t test new code directly in your production Salesforce org, so why do it in your production Data Cloud environment? Creating a Development or UAT_Testing Data Space provides a sandbox-like environment. Here, your developers and admins can build and test new data streams, mappings, and calculated insights without any risk of disrupting the live, customer-facing data in your primary Data Space.
4. Simplified and Secure User Access
Not everyone in your company should see all the data. By using multiple Data Spaces, you can implement a more granular security model. You can assign users and permission sets to specific Data Spaces, ensuring that teams only have access to the data environments relevant to their roles. This aligns perfectly with Salesforce’s “Enhance Data Space Security” feature, which uses permission sets to control access.
How to Create an Additional Data Space: A Step-by-Step Guide
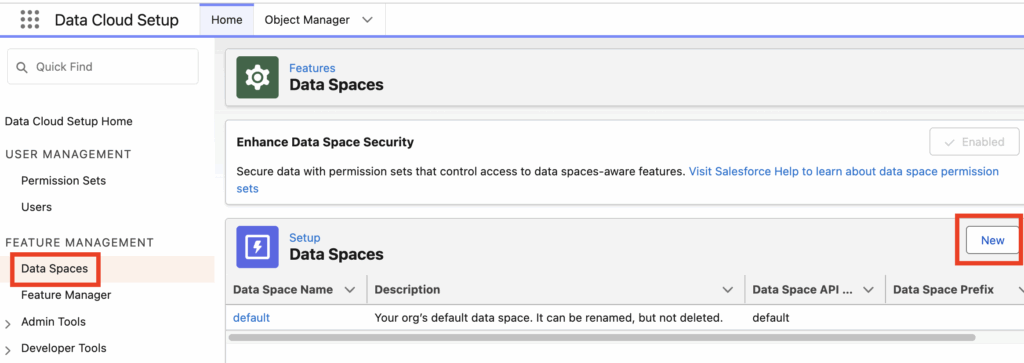
Salesforce makes creating a new Data Space straightforward. As seen in the setup menu, it’s just a few clicks away.
- Navigate to Setup: From your Salesforce org, go to Setup and use the Quick Find box to search for “Data Cloud Setup.”
- Access Data Spaces: On the Data Cloud Setup page, look for Feature Management in the left-hand navigation pane and click on Data Spaces.
- Initiate a New Data Space: You will see your
defaultdata space listed. To the top right of this list, click the New button. - Define Your Data Space: A pop-up window will appear, asking for the following details:
- Data Space Name: A user-friendly label (e.g., “EMEA Marketing” or “Development Sandbox”).
- Description: A brief explanation of the space’s purpose. This is crucial for future reference!
- Data Space API Name: The unique, programmatic name for the space (e.g.,
EMEA_Marketing). - Data Space Prefix: A 1-3 character prefix (e.g.,
EM_). This prefix will be added to the API names of all objects created within this Data Space, preventing naming collisions between spaces. Choose this carefully, as it cannot be changed.
- Save and Configure: Click Save. Your new Data Space is now created! The next steps involve configuring it by assigning users via permission sets and beginning to create data streams and other assets within it.
Best Practices for a Multi-Space Strategy
- Plan Ahead: Before creating spaces, map out your organizational structure, data governance needs, and user roles.
- Establish Naming Conventions: Decide on a clear and consistent naming convention for your Data Spaces and their prefixes.
- Document Everything: Keep a record of what each Data Space is for, who the owner is, and what kind of data it contains.
- Start Small: Begin with one or two additional spaces for a clear use case (like a development space) and expand as your needs grow.
Conclusion: Take Control of Your Data Cloud
While the default Data Space is a great starting point, the true power and scalability of Salesforce Data Cloud are unlocked when you strategically implement additional Data Spaces. By segmenting your data, you create a more secure, organized, and governable environment that empowers your teams to work more efficiently while respecting data privacy.
Take a look at your Data Cloud implementation today. Is it time to move beyond the default?
Help Article:
https://help.salesforce.com/s/articleView?id=data.c360_a_data_spaces_create.htm&type=5