Master Your Salesforce Agentforce Deployments: A Step-by-Step Guide to Using Change Sets
Supercharge your customer service with Salesforce Agentforce Agents, intelligent AI-powered assistants designed to automate tasks and provide exceptional support. But building a brilliant bot in your sandbox is only half the battle. To bring your Agentforce Agent to life in your production environment, you need a reliable deployment strategy.
This guide will walk you through the process of deploying your Salesforce Agentforce Agent using change sets, the native Salesforce tool for migrating metadata between related orgs. We’ll cover everything from creating the outbound change set to deploying it in your target org, ensuring a smooth and successful launch for your AI agent.
Before You Begin: Pre-Deployment Checklist
Before diving into the deployment process, ensure you have the following prerequisites in place:
- A deployment connection: You need a configured deployment connection between your source (sandbox) and target (production) orgs.
- The right permissions: You’ll need the “Manage Change Sets” and “Deploy Change Sets” permissions in your respective orgs.
- API Version: Ensure your orgs and any related tools are compatible with Salesforce API version 60.0 or higher to support the new generative AI components.
- Agent Deactivation: Deactivate the bot in the source org before initiating the deployment to avoid potential conflicts.
Step-by-Step: Deploying Your Agentforce Agent
Follow these detailed steps to deploy your Salesforce Agentforce Agent using a change set.
1. Create an Outbound Change Set
First, you’ll need to create an outbound change set in your source org. This acts as a container for all the components you want to move.
- Navigate to Setup in your source org.
- In the Quick Find box, search for and select Outbound Change Sets.
- Click New to create a new change set.
- Give your change set a descriptive name and an optional description.
- Click Save.
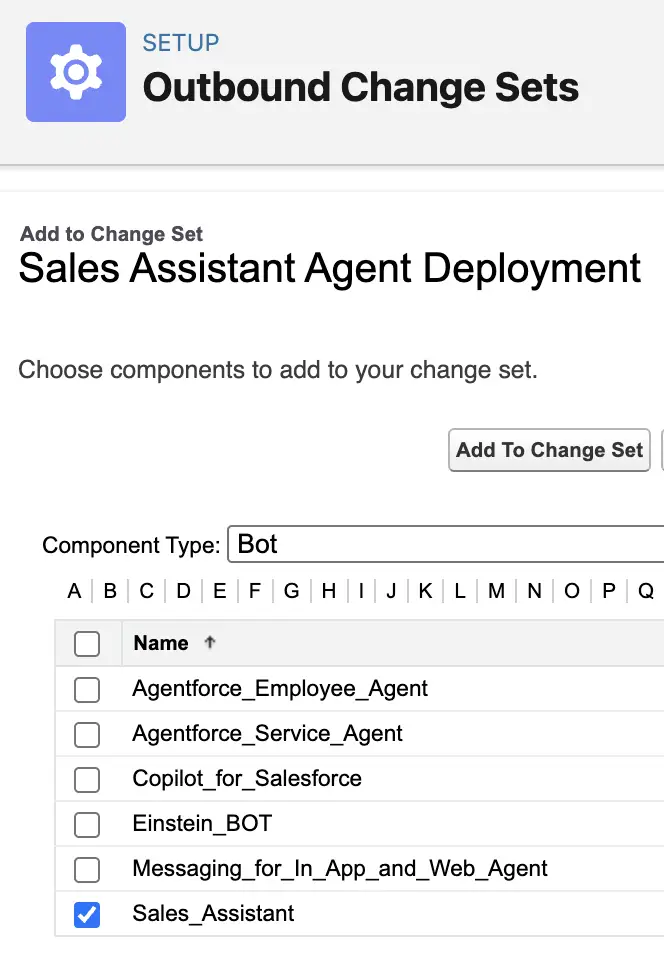
2. Add the Core Agentforce Components
With your change set created, it’s time to add the essential components of your Agentforce Agent.
- In the “Change Set Components” section, click Add.
- From the “Component Type” dropdown, select BOT.
- Choose your Agentforce Agent from the list and click Add to Change Set.
3. Include the Agentforce Agent Version
Next, you need to add the specific version of the agent you want to deploy.
- Click the View/Add Dependencies button. This will show you all the components related to your selected bot.
- Select the checkbox next to the Agentforce Agent Version you wish to deploy.
- Click Add to Change Set.
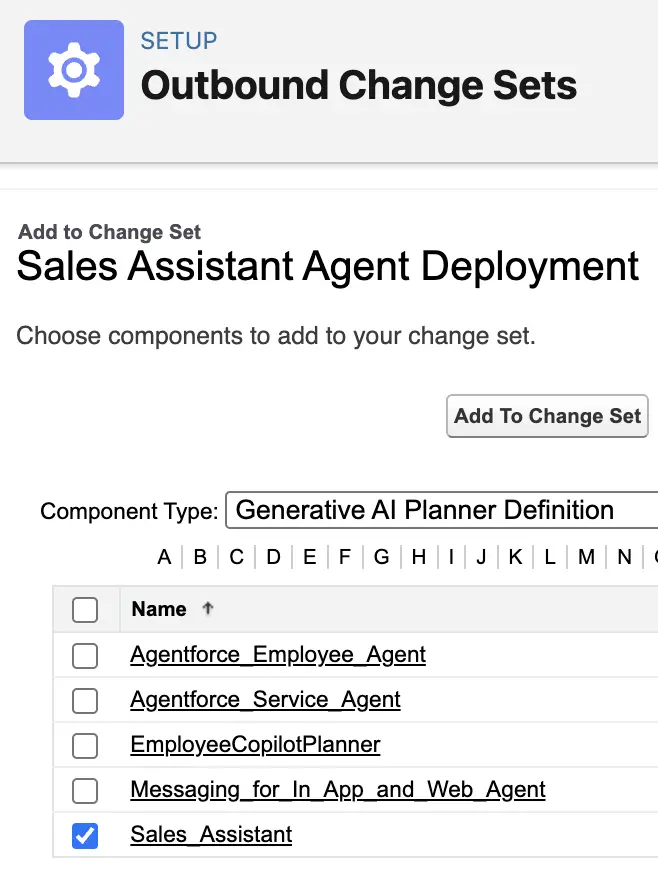
4. Add the Generative AI Planner Definition
The Generative AI Planner Definition is the core of your agent’s reasoning capabilities.
- Go back to the “Change Set Components” section and click Add.
- Select Generative AI Planner Definition as the component type.
- Select your Agentforce Agent and click Add to Change Set.
5. Include Custom Topics and Actions (If Applicable)
If your Agentforce Agent uses custom topics or actions, you’ll need to add their dependencies to the change set.
- Click View/Add Dependencies.
- Select the dependencies related to your Agentforce Agent. These will typically include:
- Generative AI Function Definition: These are the specific actions your agent can perform.
- Generative AI Plugin Definition: These define the topics your agent can understand and respond to.
- Flow Definition or Apex Class: If your custom actions are built using Flow or Apex, you must include these definitions.
- After selecting all the necessary dependencies, click Add to Change Set.
6. Upload to the Target Org
Once you’ve added all the components and their dependencies, you’re ready to upload the change set.
- Click the Upload button.
- Select the target organization where you want to deploy the Agentforce Agent.
- Click Upload.
Final Steps: Validation and Deployment
The final stage of the process takes place in your target organization.
7. Validate and Deploy the Inbound Change Set
Before deploying the changes, it’s a best practice to validate them to ensure a successful deployment.
- Log in to your target organization.
- Navigate to Setup and search for Inbound Change Sets.
- You should see the change set you uploaded from your source org. Click on its name.
- Click Validate to run a pre-deployment check. This will identify any potential issues without making any changes to your org.
- Once the validation is successful, click Deploy.
After the deployment is complete, navigate to the Agentforce Agents page in your target org’s setup to confirm that your agent and all its components have been successfully deployed. Remember to activate your Agentforce Agent in the production environment.
By following these steps, you can confidently and effectively deploy your Salesforce Agentforce Agents using change sets, ensuring a seamless transition from development to a live production environment.