1. Create a file with the extension “.js” using the following code.
window._snapinsSnippetSettingsFile = ( function() {
console.log( "Code from Static Resource loaded" );
let chatAccNm = document.getElementById( "chatAccNm" ).innerHTML;
console.log( 'Account Name - ' + chatAccNm );
/* Pre-populating pre-chat form */
embedded_svc.snippetSettingsFile.extraPrechatFormDetails = [
{ "label":"Web Company", "value":chatAccNm, "displayToAgent":true }
];
/* Linking Chat to Account to Case */
embedded_svc.snippetSettingsFile.extraPrechatInfo = [ {
"entityName":"Account",
"showOnCreate":true,
"linkToEntityName":"Case",
"linkToEntityField":"AccountId",
"saveToTranscript":"AccountId",
"entityFieldMaps": [ {
"isExactMatch":true,
"fieldName":"Name",
"doCreate":false,
"doFind":true,
"label":"Web Company"
} ]
} ];
}
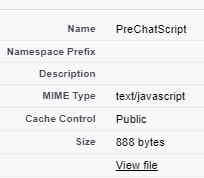
)();2. Upload the File in Static Resource. Set Cache Control to Public. Copy the Static Resource Name.
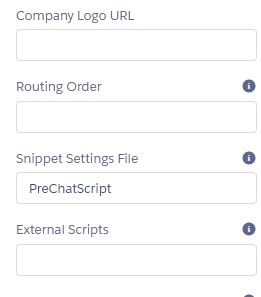
3. Use the Static Resource Name in Snippet Settings File in Experience Cloud Builder’s Embedded Service Chat Component Properties.
4. Create the following LWC Component for PreChat.
HTML:
<template>
<lightning-card title="Prechat Form">
<template class="slds-m-around_medium" for:each={fields} for:item="field">
<template if:true={field.showField} key={field.name}>
<lightning-input
key={field.name}
name={field.name}
label={field.label}
value={field.value}
max-length={field.maxLength}
required={field.required}>
</lightning-input>
</template>
</template>
</lightning-card>
<br/>
<lightning-button
label="Start Chat"
title="Start Chat"
onclick={handleStartChat}
class="slds-m-left_x-small"
variant="brand">
</lightning-button>
</template>
JavaScript:
import BasePrechat from 'lightningsnapin/basePrechat';
import { api } from 'lwc';

export default class Prechat extends BasePrechat {

@api prechatFields;
fields;
namelist;

/**
* Set the button label and prepare the prechat fields to be shown in the form.
*/
connectedCallback() {

this.fields = this.prechatFields.map( field => {
console.log( 'Field is ', JSON.stringify( field ) );
let showField = true;
if ( field.label == 'Web Company' ) {
showField = false;
}
const { label, name, value, required, maxLength } = field;
return { label, value, name, required, maxLength, showField };
});
this.namelist = this.fields.map( field => field.name );

}

/**
* On clicking the 'Start Chatting' button, send a chat request.
*/
handleStartChat() {

this.template.querySelectorAll( "lightning-input" ).forEach( input => {
this.fields[ this.namelist.indexOf( input.name ) ].value = input.value;
});
console.log( 'Starting Chat' );
this.startChat( this.fields );

}

}
JS-meta.xml:
<?xml version="1.0" encoding="UTF-8"?>
<LightningComponentBundle xmlns="http://soap.sforce.com/2006/04/metadata">
<apiVersion>52.0</apiVersion>
<isExposed>true</isExposed>
<targets>
<target>lightningSnapin__PreChat</target>
</targets>
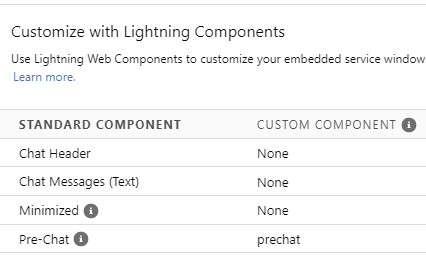
</LightningComponentBundle>5. Configure the LWC as the Pre-Chat Component in Embedded Service Deployment.
6. Create the following Apex Class and Aura Component.
Apex Class:
public class PreChatValuesController {

@AuraEnabled
public static user fetchUserDetails() {

User u = [ SELECT Id, FirstName, LastName, Email, Phone, Account.Name
FROM User
WHERE Id =: userInfo.getUserId() ];
return u;

}

}
Aura Component:
<aura:component implements="forceCommunity:availableForAllPageTypes" access="global" controller="PreChatValuesController">
<aura:handler name="init" value="this" action="{!c.doInit}"/>
<aura:attribute name="userInfo" type="user"/>
<div id="chatFName" hidden="true">
{!v.userInfo.FirstName}
</div>
<div id="chatLName" hidden="true">
{!v.userInfo.LastName}
</div>
<div id="chatEmail" hidden="true">
{!v.userInfo.Email}
</div>
<div id="chatPhone" hidden="true">
{!v.userInfo.Phone}
</div>
<div id="chatAccNm" hidden="true">
{!v.userInfo.Account.Name}
</div>
</aura:component>
Aura Component JavaScript:
({
doInit : function(component, event, helper) {
let action = component.get( "c.fetchUserDetails" );
action.setCallback( this, function( response ) {
let state = response.getState();
if ( state === "SUCCESS" ) {
let userResponse = response.getReturnValue();
console.log( 'userResponse is ', JSON.stringify( userResponse ) );
if ( !userResponse.hasOwnProperty( 'Account' ) ) {
console.log( 'Internal User' );
userResponse = Object.assign( userResponse, { 'Account' : { 'Name':'' } } );
}
component.set( "v.userInfo", userResponse );
}
});
$A.enqueueAction( action );
}
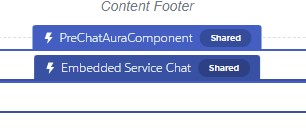
})7. Drag and Drop the Aura Component to the Experience Cloud Builder. Just above the Embedded Service Chat component.
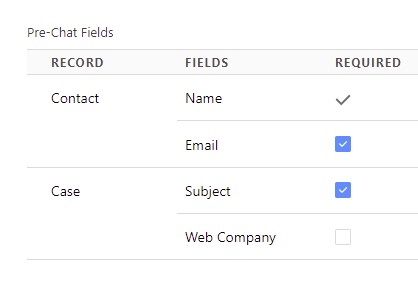
8. Add Web Company field in the Embedded Service Deployment.
9. Publish the Experience Cloud and test it by initiating a Chat.
Process:
1. When the Site is loaded, the Aura Component will do the Apex Call and get the User details including Account Name.
2. When the Chat isinitiated, the JS file from Static Resource will load. As per the LWC, it will hide the Web Company field.
3. The JS file will get the Account Name from the Aura Component. It will search for account records based on the Account Name passed from the Aura component.
4. Matching Account will be linked to Chat Transcript and Case.
Note:
When an internal user tries to access the Site, the Account Name will be blank. So, the Case and Chat Transcript won’t be linked to any Account.