Salesforce Messaging for Web allows businesses to connect with their customers directly through a chat interface on their website. A crucial part of this setup is ensuring users are aware of and agree to your terms and conditions before initiating a chat. This guide will walk you through configuring these settings within Salesforce.
Key Steps to Configure Terms and Conditions:
Based on the Salesforce interface, here’s how to set up and display your terms and conditions:
1. Access Custom Labels for Chat:
- Navigate to the Embedded Service Deployment in your Salesforce setup that manages chat configurations. This is typically where you can customize various aspects of the chat window.
- Open the Embedded Service Deployment configuration.
- You’ll find options to manage “Custom Labels.” This is where you’ll define the text and links related to your terms and conditions.
2. Define Your Terms and Conditions Label:
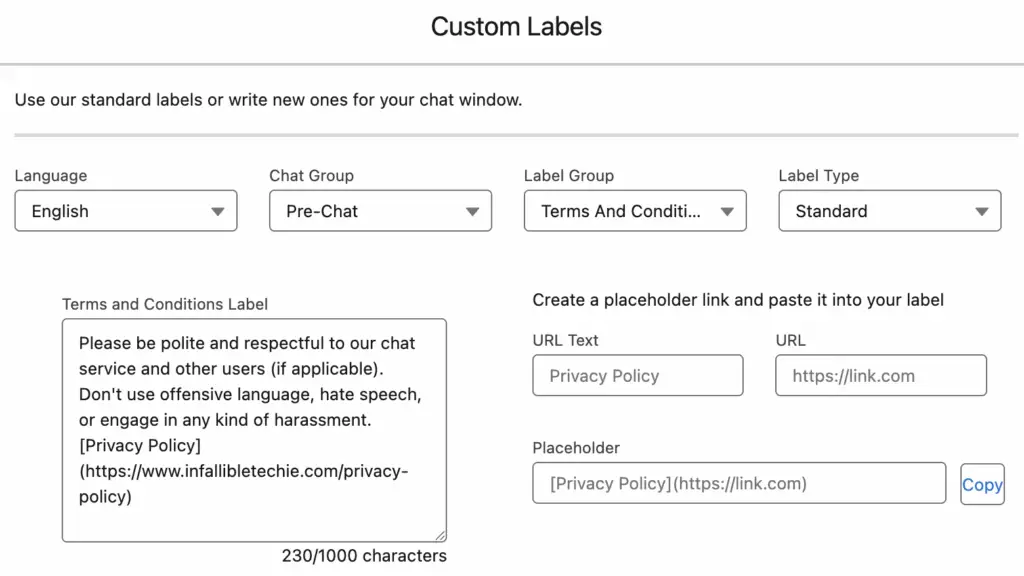
- Language: Select the language for which you are configuring the terms.
- Chat Group: Choose the relevant chat group, such as “Pre-Chat,” to ensure the terms are displayed before the conversation begins.
- Label Group: Select “Terms And Conditions” to specifically edit this label.
- Label Type: Keep this as “Standard.”
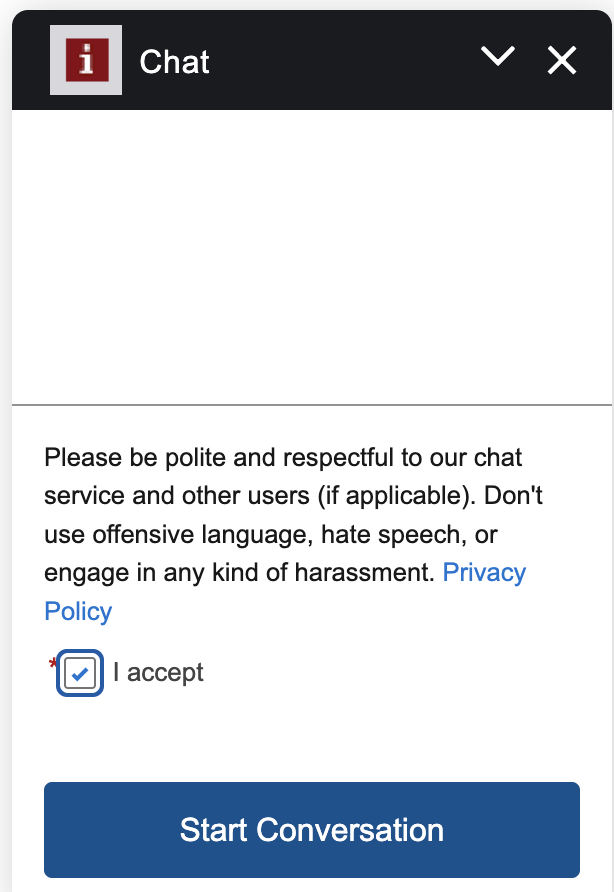
- Terms and Conditions Label Text: In the main text area, input the message you want to display to your users. This should clearly state your policies. For example: “Please be polite and respectful to our chat service and other users (if applicable). Don’t use offensive language, hate speech, or engage in any kind of harassment.”
- You can include placeholders for links within this text.
3. Create and Insert Placeholder Links:
- To include links to your detailed Privacy Policy or full Terms and Conditions pages, use the “Create a placeholder link and paste it into your label” section.
- URL Text: Enter the display text for your link (e.g., “Privacy Policy”).
- URL: Enter the full web address (URL) of your policy page (e.g.,
https://www.infallibletechie.com/privacy-policy). - Placeholder: Salesforce will generate a placeholder code (e.g.,
[Privacy Policy](https://www.infallibletechie.com/privacy-policy)). - Copy and Paste: Click “Copy” and then paste this placeholder into your “Terms and Conditions Label” text where you want the link to appear.
4. Enable Terms and Conditions in the Customer User Interface:
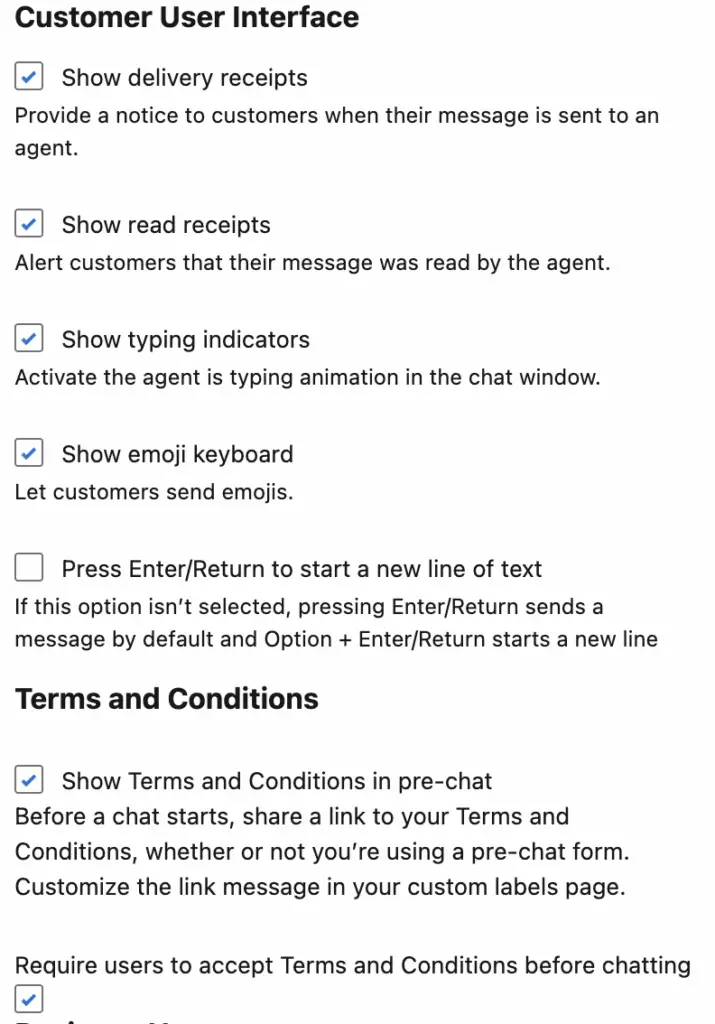
- Navigate to the “Customer User Interface” settings for your chat configuration.
- Show Terms and Conditions in pre-chat: Ensure this box is checked. This setting will “Before a chat starts, share a link to your Terms and Conditions, whether or not you’re using a pre-chat form. Customize the link message in your custom labels page.”
- Require users to accept Terms and Conditions before chatting: Crucially, check this box. This makes it mandatory for users to agree to your terms before they can proceed with the chat.
By following these steps, you can effectively inform users of your policies and ensure they consent before engaging with your support team via Salesforce Messaging for Web. This practice promotes transparency and helps manage expectations for both your customers and your agents.
Output: