Unlocking Unstructured Data: How to Ingest PDFs files stored in AWS S3 Bucket into Salesforce Data 360(Data Cloud)?
In the era of Generative AI, data is only as good as its accessibility. While structured data has long been the gold standard, a massive amount of enterprise intelligence is locked away in unstructured formats like PDFs.
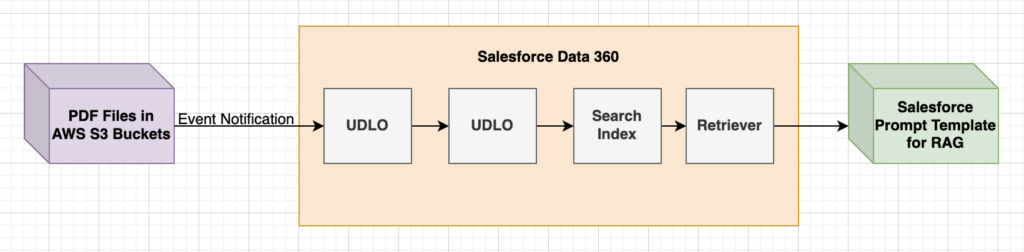
For Architects, Developers, and Analysts, the challenge is bridging the gap between storage (AWS S3 Bucket) and intelligence (Salesforce Data 360). This guide provides a technical walkthrough on configuring Salesforce Data Cloud (Data 360) to ingest, chunk, and index unstructured PDF files stored in an AWS S3 Bucket.
By following this guide, you will enable Semantic Search and create a foundation for Retrieval Augmented Generation (RAG).
Prerequisites
Before diving into the configuration, ensure your local environment is ready. You will need:
- Salesforce Data Cloud (provisioned and enabled)
- AWS Account (with permissions to create S3 buckets, IAM users, and Lambda functions)
- Command Line Tools:
Phase 1: AWS Configurations
The first step involves setting up the storage container and the identity required for Salesforce to access it.
1. Create the S3 Bucket
Create a standard S3 bucket to store your PDF files.
- Tip: Create the bucket in the same AWS region where you plan to deploy your Lambda functions later.
- Action: Note down the Bucket Name and Region.
2. IAM User Setup
Create a dedicated IAM user to handle the handshake between AWS and Salesforce.
- Navigate to the AWS Console IAM dashboard.
- Create a new User.
- Assign the “AmazonS3FullAccess” permission policy (or a scoped-down policy allowing read/list on your specific bucket).
- Important: Generate and securely save the Access Key and Secret Key.
Phase 2: Salesforce Data Cloud Connector Setup
Now, we connect Data Cloud to the S3 bucket using the credentials generated in Phase 1.
Configure the AWS S3 Connector
- Navigate to Data Cloud Setup.
- Under External Integrations, click Other Connectors.
- Click New and select Amazon S3.
- Enter a Connection Name, and paste your Access Key & Secret Key.
- Click Test Connection to verify.
- Click Save.
Create the Unstructured Data Lake Object (UDLO)
This object will act as the container for your PDF data within Data Cloud.
- Go to the Data Cloud App via the App Launcher.
- Select the Data Lake Objects tab and click New.
- Select From External Files and click Next.
- Choose the Amazon S3 connector you just created.
- Select Connection: Choose your specific connection.
- Directory Configuration:
- Directory Path: Use
/if files are at the bucket root. - File Pattern: Use
*.pdfto strictly include PDF files. - Note: You can add up to 5 directories by clicking “More Files”.
- Directory Path: Use
- Click Next.
- Define the Object Name and Object API Name for the UDLO and UDMO (Unstructured Data Model Object).
- Crucial Step: Enable “Enable semantic search with system defaults”.
- Note the “Search Index Configuration Name” generated by the system.
- Click Save and ensure the UDLO Status is Active.
Phase 3: Security & Pipeline Configuration
To keep Data Cloud in sync with S3, we need a file notification pipeline. This requires secure authentication via OAuth using a Certificate.
We will use OpenSSL to generate the certificates required for the OAuth JWT Bearer Flow. Create a folder named Cert on your local machine and run the following commands inside it.
1. Create the private/public key pair:
openssl genrsa -out keypair.pem 20482. Create a digital certificate from the key pair:
openssl req -new -x509 -nodes -sha256 -days 365 -key keypair.pem -out certificate.crt3. Create a pkcs8 private key:
openssl pkcs8 -topk8 -nocrypt -in keypair.pem -out private.keyConfigure Salesforce External Client App
- In Salesforce Setup, go to External Client App Manager.
- Click New External Client App.
- Enable “Enable OAuth”.
- Callback URL: Enter your My Domain URL (e.g.,
https://infallibletechiedemo.my.salesforce.com/). - OAuth Scopes: Select the following:
- Manage user data via APIs (
api) - Perform requests at any time (
refresh_token, offline_access) - Manage Data Cloud Ingestion API data (
cdp_ingest_api)
- Manage user data via APIs (
- Check “Enable JWT Bearer Flow”.
- Upload the
certificate.crtyou created earlier. - Click Create.
- Copy the Consumer Key and Consumer Secret.
Authorize the App
To initialize the OAuth flow, we must manually authorize the app once.
- In Salesforce Setup, verify OAuth and OpenID Connect Settings has Allow OAuth Username-Password Flows toggled ON.
- Construct the following URL in your browser (replace the placeholders with your actual values):
<YOUR_SALESFORCE_MY_DOMAIN_URL>/services/oauth2/authorize?response_type=code&client_id=<YOUR_CONSUMER_KEY>&scope=api refresh_token cdp_ingest_api&redirect_uri=<YOUR_CALLBACK_URL>&code_challenge=SHA256 - When prompted, click Allow.
- You will be redirected to your Callback URL, confirming authorization.
Phase 4: Installer Script Execution
This phase automates the deployment of the AWS Lambda function that listens to S3 events and pushes metadata to Data Cloud.
Prepare the Installer
- Download the S3 file notification installer script.
- Download and unzip
aws_lambda_function.zip. - Unzip the installer script and move the files to a folder (e.g.,
aws). - Open
input_parameters_s3.confin a code editor (like VS Code) and update the environment variables with your specific Salesforce and AWS details.
Run the Script
Open your terminal and navigate to your folder (cd aws).
1. Export AWS Credentials:
Set your session credentials so the script can provision resources in your AWS account.
export AWS_ACCESS_KEY_ID="<Your AWS Access Key>"
export AWS_SECRET_ACCESS_KEY="<Your AWS Secret Access Key>"
export AWS_SESSION_TOKEN="<Your AWS Session Token>"
export AWS_DEFAULT_REGION=<Your AWS Region>
2. Execute the Installer:
chmod +x setup_s3_file_notification.sh
./setup_s3_file_notification.sh input_parameters_s3.conf
Note: This process may take some time. Wait for the success message.
Phase 5: Retriever Setup & Verification
Once the pipeline is active, you need to configure how Salesforce retrieves this data.
Configure Einstein Studio Retriever
- Navigate to the Einstein Studio tab.
- Select Retrievers -> New Retriever.
- Choose Individual Retriever.
- Select your Data Space, Data Model, and the Search Index Configuration noted earlier.
- Select All Documents.
- Fields to Return: Select
Related Attributes --> Chunk --> Chunk. - Save and Activate the custom retriever.
Verification & Troubleshooting
To verify the setup:
- S3 Check: Go to your S3 Bucket properties. Under “Event notifications,” ensure a new event exists.
- Lambda Check: Verify
aws-s3-to-sf-lambda-fnexists in the AWS Lambda console. - End-to-End Test:
- Upload a PDF to your S3 bucket.
- Monitor the Lambda logs via CloudWatch.
- Check the Data Explorer in Salesforce (DMO view) for new entries.
Use the custom retriever in a Flex Prompt Template to quickly test it out.

Technical Recommendations & Best Practices
While the steps above provide a functional implementation, consider these best practices for production environments regarding the code and security configurations used:
- Secure Credential Management:
- In the “Install Script Execution” section, the code utilizes
exportcommands to set AWS credentials. In a production environment, avoid typing secrets directly into the shell history. Instead, useaws configureto set up a profile or use temporary IAM roles if running from an EC2 instance/CloudShell. - Ensure the
input_parameters_s3.conffile is added to your.gitignoreto prevent committing sensitive configuration data to version control.
- In the “Install Script Execution” section, the code utilizes
- Least Privilege Principle:
- The guide uses
AmazonS3FullAccess. For production, refine this policy to only allows3:GetObjectands3:ListBucketon the specific bucket used for Data Cloud ingestion.
- The guide uses
- Script Permissions:
- The command
chmod +xmakes the script executable. Always review the contents of third-party shell scripts (cat setup_s3_file_notification.sh) before making them executable to ensure no malicious commands are included.
- The command
- Error Handling in Lambda:
- If you notice PDFs failing to index, check the CloudWatch logs. Common issues include file size limits or unsupported encryption on PDFs. Ensure your Lambda function has adequate memory allocated to process the file sizes you expect.
High level Steps:
AWS Configurations:
1. Create a S3 Bucket. This S3 Bucket is for storing the PDF files. Please make sure the S3 Bucket is created in the same AWS account region. Note down the Bucket name.
2. Navigate to IAM. Create an User. Assign “AmazonS3FullAccess” Permission policy to the user. Get the Access Key and Secret Key.
Salesforce Configurations:
AWS S3 Connector Setup:
1. Navigate to Data Cloud Setup.
2. Under “External Integrations”, click Other Connectors.
3. Click New and select Amazon S3 as the connector. Enter Connection Name, Access Key & Secret Key.
4. Click the “Test Connection” button to test the connectivity.
5. Click Save.
Unstructured Data Lake Object(UDLO) Setup:
1. From App Launcher, select Data Cloud App.
2. Click Data Lake Objects tab and then click New.
3. From the New Data Lake Object menu, select From External Files, and click Next.
4. Choose the Amazon S3 connector, and click Next.
5. From the Select Connection dropdown list, select a connection. Data Cloud auto-populates the source based on the connection that you select.
6. In the Directory field, point to a specific folder or an entire directory in your blob store. All folders and subfolders in a directory are included. Optionally, use wildcard characters to specify a file name pattern for multiple files. For Directory Path, use “/” if you are not using any folders inside the S3 Bucket. For File Pattern, use “*.pdf” to include all the PDF Files.
7. To add more directories, click More Files. You can include up to 5 directories.
8. Click Next.
9. Enter an Object Name and an Object API Name for the UDLO and UDMO.
10. Click Next.
11. Enable “Enable semantic search with system defaults”. Make a note of “Search Index Configuration Name”.
12. Click Save. Make sure the Status of the UDLO is Active.
File notification Pipeline Setup:
We have to set up a file notification pipeline to notify Data Cloud whenever files are added, updated, or deleted from your external blob store(S3 Bucket).
Installation:
Download and install the following:
Private-Public Key Pair and Certificate creation:
To configure OAuth for the Salesforce External Credential(Connected app) you will use in your file notification pipeline, create a private/public RSA key pair and a digital x509 certificate.
You can use the following OpenSSL commands to create Private-Public Key Pair and Certificate. Create a Folder in your PC or laptop to store the generated Private-Public Key Pair and Certificate. I created a folder with the name “Cert”. When you execute the OpenSSL commands, make sure you are in the folder path in your terminal.
1. Use the following OpenSSL command to create the private/public key pair.
openssl genrsa -out keypair.pem 20482. Use the following OpenSSL command to create a digital certificate from the key pair.
openssl req -new -x509 -nodes -sha256 -days 365 -key keypair.pem -out certificate.crt3. Use the following OpenSSL command to create a pkcs8 private key from the key pair.
openssl pkcs8 -topk8 -nocrypt -in keypair.pem -out private.keyDownload the S3 File Notification Installer Script and Function:
- Download the S3 file notification installer script.
- Download and unzip aws_lambda_function.zip.
I used this tool to download it from GIT since Download option wasn’t available.
Salesforce External Client App(Connected App) and OAuth Settings configuration:
1. Go to External Client App Manager in Salesforce Setup.
2. Click the “New External Client App” button.
3. Enable “Enable OAuth”.
4. In the “Callback URL”, you can enter your Salesforce My Domain URL. I have used “https://infallibletechiedemo.my.salesforce.com/” since it is my Salesforce Org’s My Domain URL.
5. Select the following OAuth Scopes.
Manage user data via APIs (api)
Perform requests at any time (refresh_token, offline_access)
Manage Data Cloud Ingestion API data (cdp_ingest_api)
6. Enable “Enable JWT Bearer Flow”.
7. Select the “certificate.crt” created using the OpenSSL command.
8. Click the “Create”.
9. Get the Consumer Key and Secret.
10. In Salesforce Setup, search for OAuth and OpenID Connect Settings.
11. Turn on Allow OAuth Username-Password Flows by toggling it on.
12. Using the Consumer Key and Callback URL created in Enable OAuth settings for the API integration, use the following URL into your browser.
<YOUR_ORG_URL>/services/oauth2/authorize?response_type=code&client_id=<YOUR_CONSUMER_KEY>&scope=api refresh_token cdp_ingest_api&redirect_uri=<YOUR_CALLBACK_URL>&code_challenge=SHA25613. When prompted to provide permission for each of the scopes you requested, click the Allow button.
14. You will be redirected to the callback URL.
Install Script Execution:
1. Unzip the “S3 file notification installer script” file.
2. Move the three files to a folder. I used a Folder with the name “aws”.
3. Open the input_parameters_s3.conf file. I used Visual Studio Code application to update the file. Replace/Update the environment variable values. This is the most crucial step.
4. In your Terminal, change the path to the folder using the cd (change directory) command.
5. Using your Terminal, set your AWS credentials (AWS_ACCESS_KEY_ID, AWS_SECRET_ACCESS_KEY, and AWS_SESSION_TOKEN) and region(AWS_DEFAULT_REGION). You can use the following command:
export AWS_ACCESS_KEY_ID="<Your AWS Access Key>"
export AWS_SECRET_ACCESS_KEY="<Your AWS Secret Access Key>"
export AWS_SESSION_TOKEN="<Your AWS Session Token>"
export AWS_DEFAULT_REGION=<Your AWS Region>
6. Run the installer script using the following command. Make sure on the same directory when you set the AWS Credentials and Region.
chmod +x setup_s3_file_notification.sh
./setup_s3_file_notification.sh input_parameters_s3.conf
This command takes more time to complete. Kindly wait until the command executed successfully. If you have used wrong configuration and want to recreate the Event, go to the S3 Bucket, click the Properties tab, check the “Event notifications” section and delete the Event that was previously created.
Retriever Setup:
1. Go to Einstein Studio tab in Salesforce.
2. Select Retrievers.
3. Click the “New Retriever” button.
4. Select Individual Retriever.
5. Select the Data Space, Data Model and the Search Index Configuration.
6. Select All Documents.
7. In the Fields to Return, select Related Attributes –> Chunk –> Chunk.
8. Review the retriever creation. Click the Save button to create the custom retriever.
9. Click the Activate button to activate the custom retriever.
Verification:
Create a Prompt Template. I used Flex type and used the Custom Retriever to verify.
Debugging/Troubleshooting:
1. Go to the S3 Bucket. Click the Properties tab. Check the “Event notifications” section. You should see a event notification created with the name shared after successfully running the installer script.
2. Go to Lambda and verify whether the Lambda is created with the name used in the input_parameters_s3.conf file. I used “aws-s3-to-sf-lambda-fn”.
3. Add a PDF file in the S3 Bucket. Open the Lambda function. Select Monitor Tab. Check “CloudWatch Logs” section. You can also click the “View CloudWatch logs” button to view the logs. Also, you can verify from Data Explorer in Salesforce. Use Data Model Object as Object and select the DMO. You should see the entries. It takes some time. So, kindly wait before checking or querying in Salesforce DLO or DMO.
Salesforce Article:
https://developer.salesforce.com/docs/data/data-cloud-int/guide/c360-a-awss3-udlo.html
Sample input_parameters_s3.conf file for reference:
#Please donot change any variable/key names (left-hand side) or change them to lower_case
#Replace below variable values with your environment values
#Below values should be in lowercase and in alphanumerical and no special characters except - and _
#Values can't have spaces, there is no need to add the values in quotes
#all the below attributes (event s3 source bucket, consumer key, rsa private key, lambda function, lambda role, lambda function s3 bucket) will be created if the resources with the provided name does not exists

#org username
SF_USERNAME=<YOUR SALESFORCE USERNAME>

#SF_LOGIN_URL is https://login.test1.pc-rnd.salesforce.com/ or https://login.test2.pc-rnd.salesforce.com/ for pre-prod, Gov cloud pre prod: https://login.stagecom.pc-rnd.salesforce.com/
#SF_LOGIN_URL is https://login.salesforce.com/ for prod
SF_LOGIN_URL=<YOUR SALESFORCE MY DOMAIN URL>

#SF_AUDIENCE_URL is https://login.test1.pc-rnd.salesforce.com/ or https://login.test2.pc-rnd.salesforce.com/ for pre-prod
#SF_AUDIENCE_URL is https://login.salesforce.com/ for prod for Gov cloud it will be my domain URL, refer : https://help.salesforce.com/s/articleView?id=000386092&type=1
#SF_LOGIN_URL will be used as SF_AUDIENCE_URL in case its empty
SF_AUDIENCE_URL=https://login.salesforce.com/

#Contains your AWS Account Id (https://docs.aws.amazon.com/IAM/latest/UserGuide/console_account-alias.html#ViewYourAWSId)
AWS_ACCOUNT_ID=<YOUR AWS ACCOUNT ID>

#region of the s3 bucket, valid aws regions can be found in https://docs.aws.amazon.com/AmazonRDS/latest/UserGuide/Concepts.RegionsAndAvailabilityZones.html
REGION=us-east-2

#name of the bucket where data files persist, value of EVENT_S3_SOURCE_BUCKET and EVENT_S3_SOURCE_KEY should be aligned with S3 connector parent dir & ULDO folder path created in the tenant org
EVENT_S3_SOURCE_BUCKET=enterprise-level-storage

#name of the folder in the above bucket where data files persist, value of EVENT_S3_SOURCE_BUCKET and EVENT_S3_SOURCE_KEY should be aligned with S3 connector parent dir & ULDO folder path created in the tenant org (please don't include any begining and ending slash to the folder name/path)
EVENT_S3_SOURCE_KEY=

#Contains the name of the S3 bucket that contains the source code .zip file downloaded from (https://github.com/forcedotcom/file-notifier-for-blob-store/blob/main/cloud_function_zips/aws_lambda_function.zip) to run your Lambda function
LAMBDA_FUNC_S3_BUCKET=aws-s3-sf-lambda

#Contains the S3 key for the Lambda function inside the S3 bucket (LAMBDA_FUNCTION_S3_BUCKET), this will also be used as prefix value for event notification, below event s3 source key value can be empty, if you wish to set notifications for entire bucket,
LAMBDA_FUNC_LOC_S3_KEY=

#local path of the source code of cloud function which needs to be downloaded from https://github.com/forcedotcom/file-notifier-for-blob-store/blob/main/cloud_function_zips/aws_lambda_function.zip
SOURCE_CODE_LOCAL_PATH=/Users/magulan/Documents/aws_lambda_function.zip

#The name of the execution role to run the Lambda function. It can be any string. eg: <yourusecase>-<yourname>-lambda-role (monitor-proj-raghu-lambda-role)
LAMBDA_ROLE=aws-s3-to-sf-lambda-role

#The name of the Lambda function to be deployed in your AWS account. It can be any string. eg: <yourusecase>-<yourname>-lambda-fn (monitor-proj-raghu-lambda-fn)
LAMBDA_FUNC_NAME=aws-s3-to-sf-lambda-fn

#name of consumer key, this has to be unique across AWS account, recommended to use your name in the key eg: raghu-s3-consumer-key
CONSUMER_KEY_NAME=sf-aws-s3-consumer-key

#Contains the Consumer Key of the connected app that you created in your org.
CONSUMER_KEY_VALUE=<YOUR SALESFORCE EXTERNAL CLIENT CREDENTIAL APP CONSUMER KEY>

#name of the private key, this has to be unique across AWS account, recommended to use your name in the key eg: raghu-s3-rsa-private-key
RSA_PRIVATE_KEY_NAME=sf-aws-s3-rsa-private-key

#local path of pem file (generated during pre-requisite steps in connected app creation, you would have generated keypair.key please rename it to keypair.pem and use it here)  For example: /Users/Name/Documents/keypair.pem
PEM_FILE_PATH=/Users/magulan/Documents/Cert/keypair.pem