In this Blog Post, we are going to see how to display Salesforce Lightning Web Component to create Case record when the Agentforce Session is escalated and agents are not available to assist.
Note:
We have used Salesforce Messaging for Web feature to display the Lightning Web Component for Case creation process.
Steps:
1. Setup Escalation Topic in the Agentforce Agent Builder to handle agents availability. You can use the following blog post for reference.
Instruction used in the Escalation Topic:
If a user explicitly asks to transfer to a live agent, invoke Business Hours Check action.

Escalate the conversation only if the Custom Variable isWithinBusinessHours is true and ignore the below instructions.

If the Custom Variable isWithinBusinessHours is false, share the Context Variable strMessage value and follow the below instructions.

Collect Contact Details First Name, Last Name and Email from the user to create a Case for the followup. After collecting the Contact details, use the following Case Creation instruction to display the Widget.

Case Creation form Options & Visual Widget Guidelines:
Role: Your role is to display the Widget for case creation. Your role is not to create the Case. The Widget will be used to handle the Case creation.
Visual Widget Construction
Format: The response must include a message and a visual widget. The visual widget must be provided as a JSON object wrapped in $ symbol at the beginning and end.
JSON Structure:
{
  "type": "caseform",
  "params": [
    {
      "paramType": "<type-of-parameter>",
      "paramValue": "<value>"
    },
    ...
  ]
}

Widget Purpose: To allow the user to create Case record from the widget.
Input Fields: FirstName, LastName and Email
Do not show the Contact Details, the widget will take care of it.
2. Create an Apex Class to handle the Case insertion process.
Sample Apex Code:
public without sharing class CreateCaseFormController {

    @AuraEnabled
    public static String createCase(
        String subject,
        String description
    ) {

        Case newCase = new Case();
        newCase.Subject = subject;
        newCase.Description = description;
        newCase.Status = 'New';
        insert newCase;
        return 'Case created successfully with ID: ' + newCase.Id;

    }

}
3. Create a Salesforce Lightning Web Component to display Case Creation form.
Sample Lightning Web Component:
HTML:
<template>
    <lightning-input
        type="text"
        value={caseSubject}
        label="Case Subject"
        class="slds-m-around_small"
        onchange={handleCaseSubjectChange}>
    </lightning-input>
    <lightning-textarea
        value={caseDescription}
        label="Case Description"
        class="slds-m-around_small"
        onchange={handleCaseDescriptionChange}>
    </lightning-textarea>
    <lightning-button
        variant="brand"
        icon-size="small"
        label="Create Case"
        title="Create Case"
        icon-position="left"
        icon-name="utility:check"
        onclick={createCaseRecord}
        class="slds-m-around_small"
        icon-alternative-text="Create Case">
    </lightning-button>
</template>
JavaScript:
import { LightningElement, api } from 'lwc';
import createCase from "@salesforce/apex/CreateCaseFormController.createCase";

export default class CreateCaseForm extends LightningElement {

    @api params = [];
    caseSubject = '';
    caseDescription = '';

    connectedCallback() {

        this.params.forEach( param => {

            if ( param.paramType && param.paramValue ) {

                this.caseDescription +=
                    "\n" + param.paramType + " : "
                    + param.paramValue;

            }

        } );

    }

    handleCaseSubjectChange( event ) {

        this.caseSubject = event.target.value;

    }

    handleCaseDescriptionChange( event ) {

        this.caseDescription = event.target.value;

    }

    createCaseRecord() {

        createCase( {
            subject: this.caseSubject,
            description: this.caseDescription
        } )
        .then( result => {

            console.log( 'Case created successfully: ', result );

            this.showCaseForm = false;

            this.dispatchEvent( new CustomEvent(
                'casecomplete',
                { detail: { message: 'Case created successfully!!!' } }
            ) );

        } )
        .catch( error => {
            console.error( 'Error creating case: ', error );
            this.dispatchEvent( new CustomEvent(
                'casecomplete',
                { detail: { message: 'Error creating case!!!' } }
            ) );
        } )

    }

}
js-meta.xml:
<?xml version="1.0" encoding="UTF-8"?>
<LightningComponentBundle xmlns="http://soap.sforce.com/2006/04/metadata">
    <apiVersion>63.0</apiVersion>
    <isExposed>true</isExposed>
</LightningComponentBundle>
4. Create a Lightning Web Component with lightningSnapin__MessagingTextMessageBubble target to display the Case Creation form. To know more about this, please check the following blog post for your reference.
Sample Lightning Web Component:
HTML:
<template>
    <div class={generateMessageBubbleClassname}>
        <lightning-formatted-rich-text
            value={textContent}>
        </lightning-formatted-rich-text>
    </div>
    <div lwc:if={showCaseForm}>
        <c-create-case-form
            params={params}
            oncasecomplete={handleCaseClose}>
        </c-create-case-form>
    </div>
    <div lwc:if={strMessage}>
        <div class={generateMessageBubbleClassname}>
            <lightning-formatted-rich-text
                value={strMessage}>
            </lightning-formatted-rich-text>
        </div>
    </div>
 </template>
JavaScript:
import { api, LightningElement } from "lwc";

/* Contstants */
const AGENT = "Agent";
const ENDUSER = "EndUser";
const CHATBOT = "Chatbot";
const PARTICIPANT_TYPES = [ ENDUSER, AGENT, CHATBOT ];
const MESSAGE_CONTENT_CLASS = "embedded-messaging-message-content";

export default class MessagingChatBubble extends LightningElement {

    strMessage;
    params = [];
    textContent;
    showCaseForm = false;
    /**
    * Deployment configuration data
    * @type {Object}
    */
    @api configuration;

    /**
    * Conversation entry data
    * @type {Object}
    */
    @api conversationEntry;

    /**
    * Returns the sender of this conversation entry
    * @returns {string}
    */
    get sender() {

        return this.conversationEntry.sender
            && this.conversationEntry.sender.role;

    }

    /**
    * Returns the class name of the message bubble.
    * @returns {string}
    */
    get generateMessageBubbleClassname() {

        if ( this.isSupportedSender() ) {

            // If the sender is an agent, end user or chatbot, return the appropriate class name
            return `${ MESSAGE_CONTENT_CLASS } ${ this.sender }`;

        } else {

            // If the sender is not supported, throw an error
            throw new Error(
                `Unsupported participant type passed in: ${ this.sender }`
            );

        }

    }

    /**
    * True if the sender is a support participant type.
    * @returns {Boolean}
    */
    isSupportedSender() {

        return PARTICIPANT_TYPES.some(
            ( participantType ) =>
                this.sender === participantType,
        );

    }

    /* Connected Callback */
    connectedCallback() {

        try {

            const entryPayload =
                JSON.parse( this.conversationEntry.entryPayload );

            if (
                entryPayload.abstractMessage &&
                entryPayload.abstractMessage.staticContent
            ) {

                // Extract the text content from the entry payload
                this.textContent =
                    entryPayload.abstractMessage.staticContent.text;

            }

        } catch (e) {

            // Handle JSON parsing error
            console.error( e );

        }

        // Matches JSON wrapped between $ symbols
        const JSONRegex = /\$([\s\S]*?)\$/;

        if ( this.textContent.match( JSONRegex ) ) {

            try {

                let matchedContents = this.textContent.match( JSONRegex );
                // Extract the JSON string from the matched contents
                const JSONString = matchedContents[ 1 ];
                const parsedJSON = JSON.parse( JSONString );

                this.params = parsedJSON.params || [];
                console.log(
                    "parsedJSON:",
                    JSON.stringify( parsedJSON )
                );

                let type = parsedJSON.type ? parsedJSON.type.toLowerCase() : "unknown";

                if ( type === "caseform" ) {

                    this.showCaseForm = true;

                }

                this.textContent =
                    this.textContent.replace( JSONRegex, "" ).trim();

            } catch ( error ) {

                console.error(
                    "Error parsing JSON:",
                    error
                );
                this.params = [];
                this.textContent = this.textContent.trim();

            }

        }

        // Log results:
        console.log(
            "Params:",
            JSON.stringify( this.params )
        );
        console.log(
            "textContent:",
            this.textContent
        );

    }

    handleCaseClose( event ) {

        // This method is called when the case is created successfully
        this.showCaseForm = false;
        console.log(
            'Message::',
            event.detail.message
        );
        this.strMessage = event.detail.message;

    }

}
CSS:
:host {
    display: block;
}

.Agent,
.Chatbot {
    float: left;
    padding: 0.5em;
    color: #FFFFFF;
    background-color: #066AFE;
    border-radius: 10px 10px 10px 0;
}

.EndUser {
    padding: 0.5em;
    color: white;
    margin-left: auto;
    background-color: #801818;
    border-radius: 10px 10px 0 10px;
}

lightning-formatted-text {
    font-size: 0.875em;
}
js-meta.xml:
<?xml version="1.0" encoding="UTF-8"?>
<LightningComponentBundle xmlns="http://soap.sforce.com/2006/04/metadata">
 <apiVersion>63.0</apiVersion>
 <isExposed>true</isExposed>
 <targets>
   <target>lightningSnapin__MessagingTextMessageBubble</target>
 </targets>
</LightningComponentBundle>
5. Give the Apex Class which is used to create case access to the Embedded Service Deployment Guest User.
- Go to Sites in Setup.
- Select the Site for the Embedded Service Deployment.
- Click Public Access Settings button to open the Guest User Profile.
- Click Apex Class Access link.
- Click Edit button.
- Give access to the “CreateCaseFormController” Apex Class.
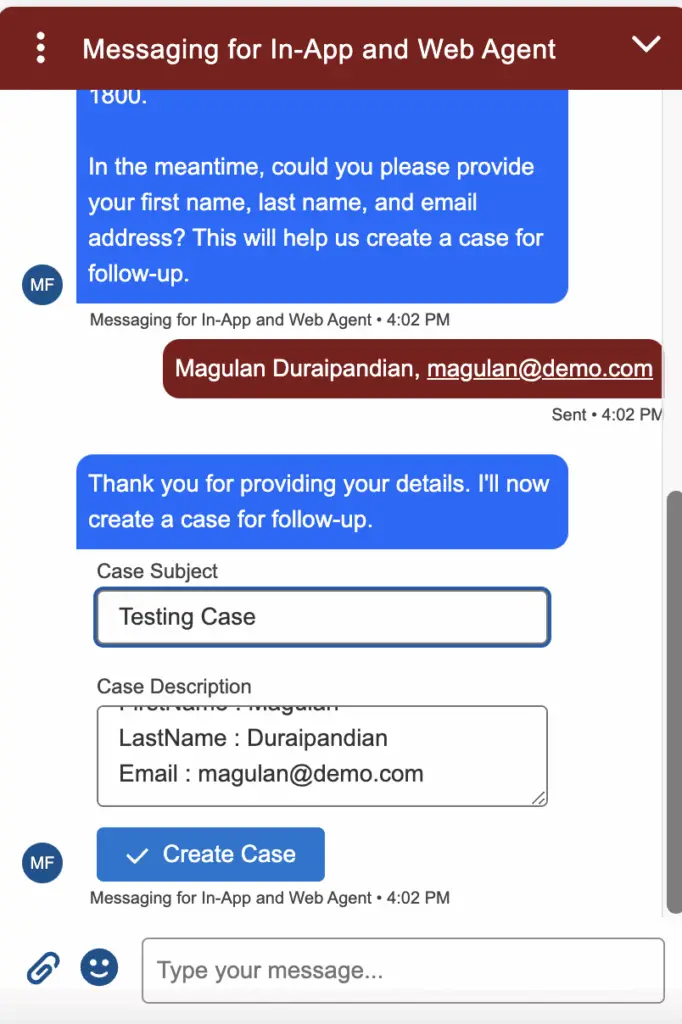
Output: