Lightning web components dispatch standard DOM events. Components can also create and dispatch custom events. Use events to communicate up the component containment hierarchy. For example, a child component, c-todo-item, dispatches an event to tell its parent, c-todo-app, that a user selected it.
Create and Dispatch Events
Create and dispatch events in a component’s JavaScript class. To create an event, use the CustomEvent() constructor. To dispatch an event, call the EventTarget.dispatchEvent() method.
The CustomEvent() constructor has one required parameter, which is a string indicating the event type. As a component author, you name the event type when you create the event. You can use any string as your event type. However, we recommend that you conform with the DOM event standard.
No uppercase letters
No spaces
Use underscores to separate words
Don’t prefix your event name with the string on, because inline event handler names must start with the string on. If your event is called onmessage, the markup would be <c-my-component ononmessage={handleMessage}>. Notice the doubled word onon, which is confusing.
Sample Code:
Sample HTML:
<template>
    <div class="slds-box slds-theme--default">
        Enter your Basic Information below
        <c-contact-form onentered={handleFromContact}></c-contact-form>
    </div>
</template>
Sample JavaScript:
import { LightningElement } from 'lwc';

export default class Sample extends LightningElement {

    handleFromContact( event ) {

        console.log ( 'Values are ' + JSON.stringify( event.detail ) );
        console.log ( 'First Name is ' + event.detail.fname );
        console.log ( 'First Name is ' + event.detail.lname );
        console.log ( 'First Name is ' + event.detail.age );

    }

}
Contact Form HTML:
<template>
    <lightning-card  title="Basic Information">
        <lightning-button label="Update" onclick={updateParent} slot="actions"></lightning-button>
        <p class="slds-p-horizontal_small">
            <lightning-input type="text" label="First Name" name="fname" onchange={handleFormInputChange}></lightning-input>
            <lightning-input type="text" label="Last Name" name="lname" onchange={handleFormInputChange}></lightning-input>
            <lightning-input type="number" label="Age" name="age" onchange={handleFormInputChange}></lightning-input>
        </p>
        <p slot="footer">Complete the Basic Information</p>
    </lightning-card>
</template>
Contact Form JavaScript:
import { LightningElement, track } from 'lwc';
export default class ContactForm extends LightningElement {
@track
firstName;
@track
lastName
@track
age;
handleFormInputChange( event ) {
switch ( event.target.name ) {
case "fname":
this.firstName = event.detail.value;
break;
case "lname":
this.lastName = event.detail.value;
break;
case "age":
this.age = event.detail.value;
break;
}
}
updateParent() {
const selectedEvent = new CustomEvent( 'entered', { detail: { fname : this.firstName, lname : this.lastName, age : this.age } } );
this.dispatchEvent( selectedEvent) ;
}
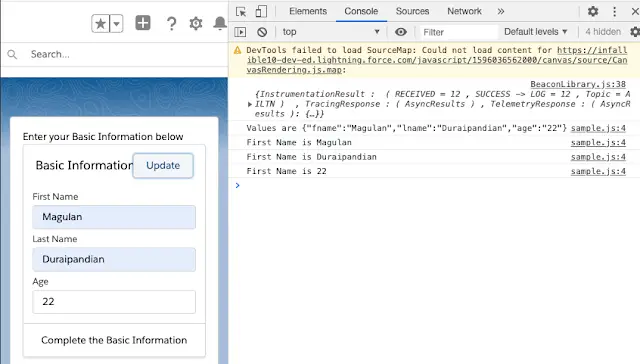
}Output: