Step-by-Step Guide: Setting up the Salesforce MCP Server in Cursor
Introduction
The way developers interact with Salesforce data is evolving. With the introduction of the Model Context Protocol (MCP), you can now connect your AI coding assistants directly to your data sources.
For Salesforce developers using Cursor IDE, this is a game-changer. By setting up the Salesforce API MCP Server, you allow Cursor’s AI to understand your Org’s specific context, query objects, and assist with development tasks more intelligently than ever before.
In this guide, we will walk you through the exact steps to configure the Salesforce MCP Server in Cursor, handle authentication, and troubleshoot common setup errors.
Prerequisites
Before we dive in, ensure you have the following:
- Cursor IDE installed on your machine.
- A Salesforce Org (Developer Edition or Sandbox recommended for testing).
- Node.js installed (required to run the
npxcommand).
Step 1: Enable MCP Service in Salesforce
First, we need to switch on the capability within your Salesforce environment.
- Log in to your Salesforce Org.
- Navigate to Setup.
- In the Quick Find box, type User Interface.
- Locate and select User Interface.
- Scroll down to find the Enable MCP Service (Beta) checkbox.
- Check the box and click Save.
Step 2: Create an External Client App
To allow Cursor to authenticate with Salesforce, you must create an External Client App. This will provide you with the credentials needed for the connection.
- Follow the official Salesforce documentation to create your app: Configure an External Client App for the MCP Server.
- Crucial Step: Once created, ensure you view the OAuth Settings and note down the Consumer Key. You will need this for the configuration in the next step.
Step 3: Configure Cursor Settings
Now, let’s bridge the gap between Cursor and Salesforce.
- Open Cursor IDE.
- Go to Cursor Settings (usually found via the gear icon or
Cmd/Ctrl + ,). - Navigate to the “Tools & MCP” section.
- Click on “New MCP Server”.
- In the configuration window, use the exact JSON snippet below.
Note: Be sure to replace
<ConsumerKey>with the key you copied in Step 2.
{
  "mcpServers": {
      "Salesforce": {
          "command": "npx",
          "args": [
              "-y",
              "mcp-remote@0.1.18",
              "https://api.salesforce.com/platform/mcp/v1-beta.2/sobject-all",
              "8080",
              "--static-oauth-client-info",
              "{\"client_id\":\"<ConsumerKey>\",\"client_secret\":\"\"}"
          ]
      }
  }
}
Once you save this, Cursor will attempt to initialize the server using npx. You may be prompted to authenticate via your browser.
Step 4: Verify the Connection
Once the server is running (you should see a green indicator in the MCP settings), it’s time to test the capabilities.
Open a new Composer window (Cmd+I or Ctrl+I) or the Chat panel in Cursor and try a prompt like:
- “Query the Account object and list the top 5 most recently created accounts.”
- “Explain the fields available on the Opportunity object based on my schema.”
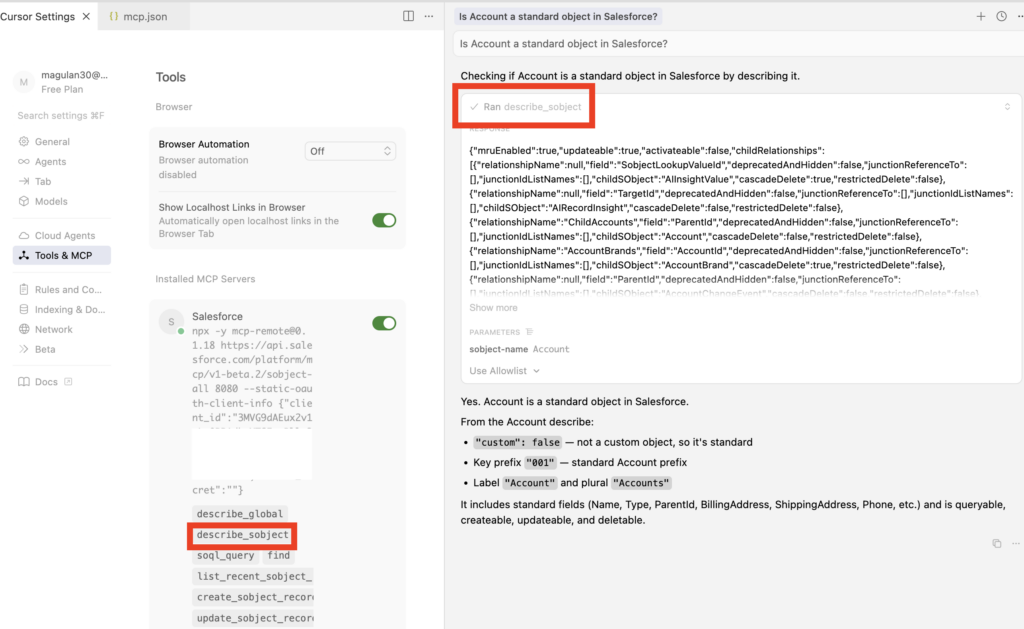
If the AI responds with real data or schema information from your Org, you have successfully connected the Salesforce API MCP Server!
Troubleshooting Common Authentication Errors
During the initial setup, specifically regarding OAuth flows, you might encounter the following error messages in the Cursor console or logs:
Authorization error: Error: No code verifier saved for sessionAuthorization error: InvalidGrantError: invalid code verifier
These usually occur due to stale authentication sessions or cached tokens.
You can resolve this by clearing the local MCP authentication cache. Run the following command in your terminal:
rm -rf ~/.mcp-authAfter executing the command:
- Go back to Cursor Settings > Tools & MCP.
- Disable the Salesforce MCP Server (toggle it off).
- Wait a few seconds, then Enable it again.
- Follow the browser authentication prompt if it appears.
Recommendations & Best Practices
- Security of Client Secrets: You will notice the
client_secretin the JSON config is left empty (""). This suggests the use of a PKCE (Proof Key for Code Exchange) flow or a public client configuration. Ensure your External Client App in Salesforce is configured to not require a client secret for maximum compatibility with this specific snippet, or update the JSON if your policy requires a secret. - Port Conflicts (Port 8080): The configuration creates a local bridge on port
8080. This is a very common port used by other web services (like Tomcat or Jenkins). If you run into “Address already in use” errors, ensure no other local servers are occupying port 8080. - Cursor Restart: If you update the JSON configuration and the changes don’t seem to apply, a full restart of the Cursor IDE is often more effective than just toggling the MCP server button.
- Beta Awareness: Remember that the “Enable MCP Service” feature in Salesforce is currently in Beta. APIs and stability may change, so always check the official Salesforce release notes for updates.
Conclusion
Integrating Salesforce with Cursor via MCP opens up a new frontier for developer productivity. By following these steps, you can seamlessly blend your IDE’s AI capabilities with your Salesforce data.
By connecting a Salesforce MCP server to Cursor, you are essentially giving the AI a direct, secure window into your specific environment. Instead of relying on generic Salesforce documentation or guessing how your architecture is structured, the AI can actively read your org’s unique context.
Why this combination is so powerful:
- Custom Metadata Awareness: The AI can pull in your exact custom objects, fields, and relationships, meaning it can write SOQL queries and Apex code that actually compile and work on the first try.
- Codebase Context: It can reference your existing Apex classes, triggers, and Lightning Web Components (LWCs) to ensure new code aligns with your established patterns and naming conventions.
- Reduced Hallucinations: Because its responses are grounded in your actual org’s live schema, it won’t invent fields or relationships that don’t exist in your specific setup.