How to Route Cases by Status Using Salesforce Omni-Channel Flows: A Step-by-Step Guide
In the modern Service Cloud landscape, the legacy “Routing Configuration” is taking a backseat to the more powerful Omni-Channel Flow. By leveraging Flow Builder, you can inject complex logic—like routing based on Case Status—directly into your support engine.
This guide walks through the technical implementation of routing “New” and “Escalated” cases to their respective queues using a combination of Record-Triggered Flows and Omni-Channel Subflows.
Phase 1: Foundation – Queues & Membership
Before touching the automation, you must define your targets. Omni-Channel needs to know where to send the work.
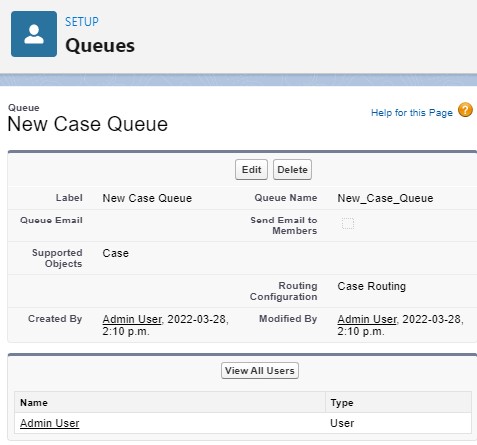
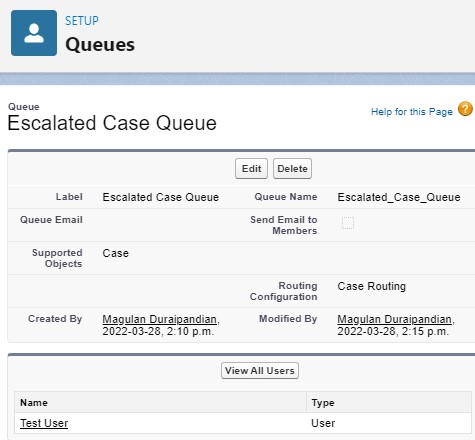
- Navigate to Setup > Queues.
- Create two new Queues:
- New Case Queue: Supported Object: Case.
- Escalated Case Queue: Supported Object: Case.
- Assign the relevant Users or Public Groups to these queues.
- Ensure these Queues are linked to your Routing Configuration (Setup > Routing Configurations).
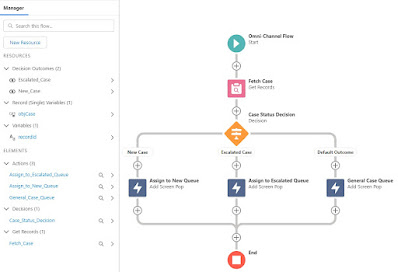
Phase 2: The Logic Engine – Create the Omni-Channel Flow
The Omni-Channel Flow is a specific flow type that handles the “Route Work” action.
- Create a New Flow and select the Omni-Channel Flow template.
- Define a variable
recordId(Text, Input only) to receive the Case ID. - Add a Decision Element to check the Case Status:
- Outcome 1 (New):
{!record.Status} == 'New' - Outcome 2 (Escalated):
{!record.Status} == 'Escalated'
- Outcome 1 (New):
- Add the Route Work Action for each path:
- Service Channel: Case
- Route to: Queue
- Queue: Select “New Case Queue” or “Escalated Case Queue” accordingly.
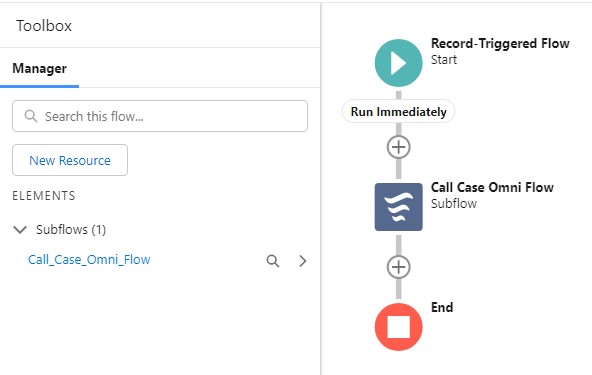
Phase 3: The Trigger – Record-Triggered Flow
To initiate the routing, we need a Record-Triggered Flow to “hand off” the case to our Omni-Channel Flow.
- Object: Case
- Trigger: A record is created or updated.
- Condition Requirements:
(Status Equals New) OR (Status Equals Escalated) - Optimize for: Actions and Related Records.
- The Subflow Component: * Drag the Subflow element onto the canvas.
- Select the Omni-Channel Flow you created in Phase 2.
- Pass the
$Record.Idinto the flow’srecordIdinput variable.
Technical Best Practices & Recommendations
Based on the architecture of this implementation, keep these senior-level considerations in mind:
- Avoid Redundant Routing: Ensure your Record-Triggered Flow has “Only when a record is updated to meet the condition requirements” selected. This prevents the Omni-Channel Flow from re-triggering every time a minor edit is made to an already routed case.
- Fallback Queues: Always define a “Default” or “Fallback” queue within your Route Work action. If a Case status doesn’t match your decision criteria, it shouldn’t disappear into a black hole; it should go to a general triage queue.
- Service Channel Limits: Ensure your “Case” Service Channel is correctly configured under Omni-Channel settings. If the capacity is set too low, cases will remain “Pending” even if the flow executes perfectly.
- Subflow Decoupling: By using a Subflow for Omni-Channel logic (as requested), you maintain a “Separation of Concerns.” This allows you to update routing logic without risking the stability of your main Case trigger framework.
Sample Configuration:
1. Create required Queues and add users to it.
2. Create an Omni-Channel Flow.
3. Create a Record-Triggered Flow. Call the Omni Flow using Sub Flow component.
When the Case is created with Status “New”, it will go to New Queue.
When the Case is created with Status “Escalated”, it will go to Escalated Queue.
Video Reference: